LRS
  • START HERE
  • DIY
    • SEWING & STYLE
    • HOME DECOR
    • JEWELRY
    • TECH DIY
    • ANIMAL
    • ROUNDUPS
    • CHRISTMAS CRAFTS
  • FASHION
    • NAIL DESIGN
    • HAIR
    • MAKE-UP
    • OUTFITS
    • FASHION INSPIRATION
    • TIPS & ADVICE
  • RECIPES
    • BREAKFAST
    • DESSERTS
    • TREATS
    • SAVORY
  • TRAVEL
    • TRAVEL
    • BERLIN GUIDE
  • INSPIRED
    • ART
    • BLOGGING
    • PERSONAL
  • ABOUT
    • CONTACT
  • SHOP
  • START HERE
  • ABOUT
  • CONTACT
  • SHOP
L A N A R E D S T U D I O
  • CRAFTS

    SEWING & STYLE

    HOME DECOR

    JEWELRY

    ROUNDUPS

    TECH DIY

    CHRISTMAS CRAFTS

    ANIMAL

    UPCYCLING

    HOME DECOR

    SMALL STUDIO APARTMENT | 10 Tips, Tricks and Ideas to Maximize Your Space

    TECH DIY

    DIY | Card Holder Phone Case

    JEWELRY

    JEWELRY DIY | Gold Leaf Teardrop Earrings

  • FASHION

    OUTFITS

    HAIR

    MAKE UP

    NAIL DESIGN

    FASHION INSPIRATION

    TIPS & ADVICE

    HAIR STYLES

    HAIR DIY VIDEO | Braided Scarf Hairstyle

    NAIL DESIGN

    NAIL DIY | It's a Glittery Sharpie Christmas

    Outfits

    OUTFIT | Autumn, Me & My Tripod

  • RECIPES

    DESSERTS

    SAVORY

    TREATS

    BREAKFAST

    BREAKFAST

    RECIPE | Sugar Free - Banana Bread

    TREATS

    RECIPE | Courgette Chips

    SAVORY

    RECIPE | Sweet Potato & Goat's Cheese Tart

  • INSPIRED

    ART

    BLOGGING

    PERSONAL

    BLOGGING

    HOW TO | 10 PRACTICAL Tips Every Blogger Should Learn

    PERSONAL

    PERSONAL | Grief and other things

    ART

    DIY | Double Exposure Photography

  • TRAVEL

    Berlin

    TRAVEL | BERLIN GUIDE

    Travel

    LIVING ABROAD | How to Make Your Temporary Home Feel Like Home

    explore

    TRAVEL

    BERLIN GUIDE

  • Personal

I will wear it in public Sewing Challenge. Final Result!

Total
0
Shares
0
0
0
I will wear it in public sewing challenge, final result
 
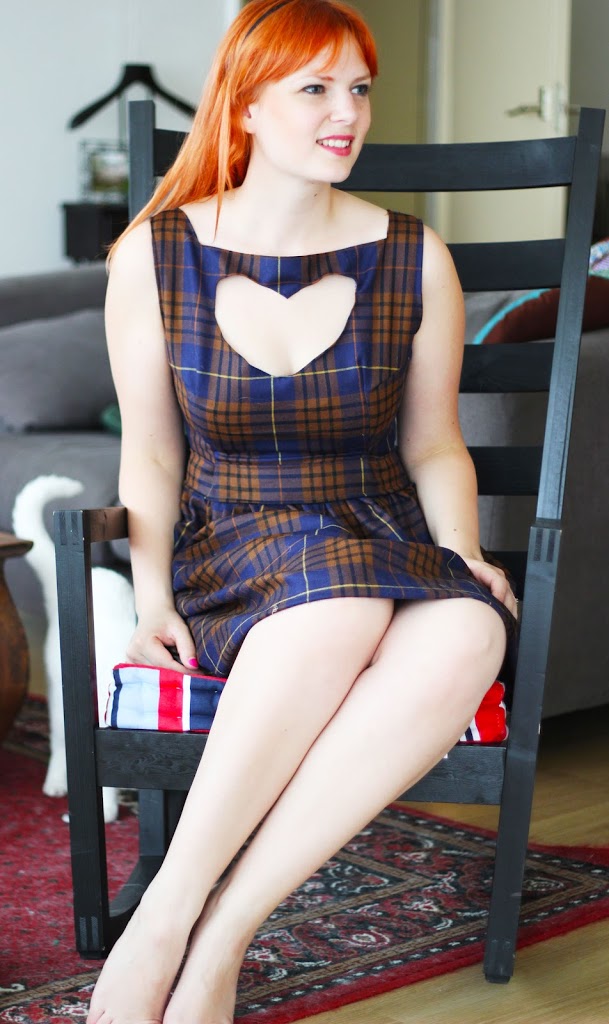
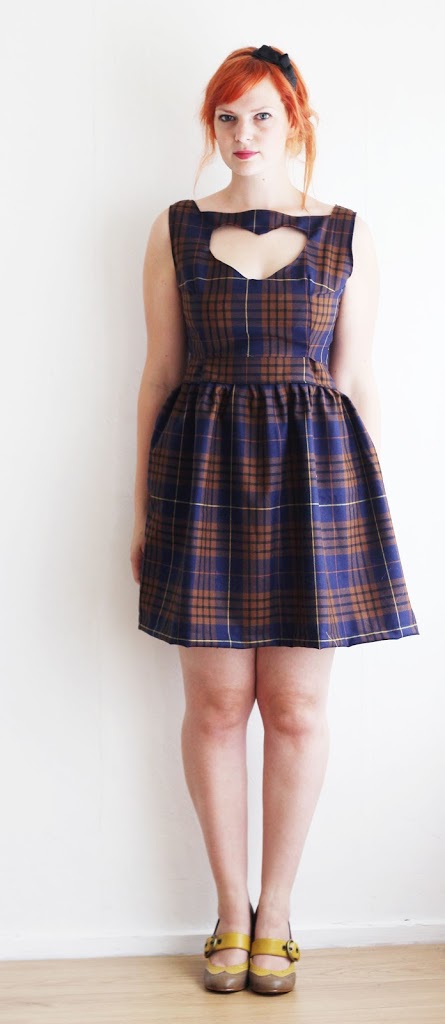
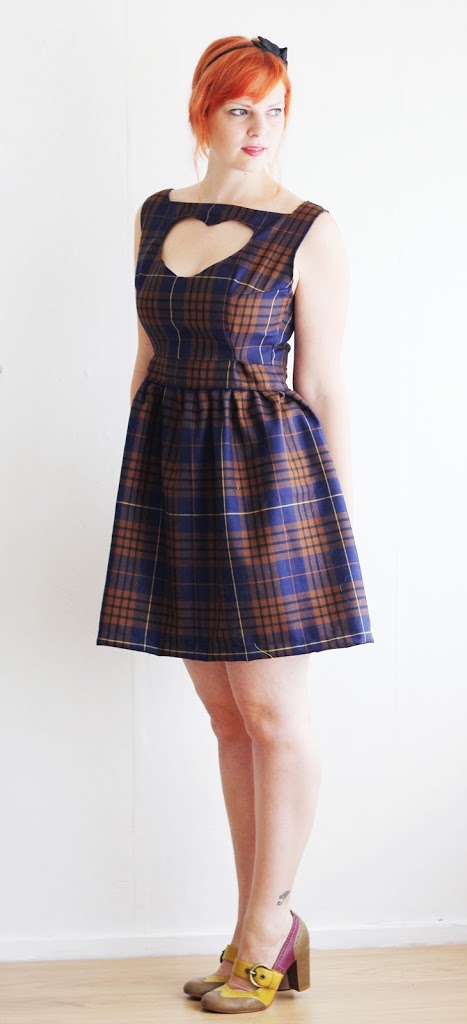
I finished my dress! I am very proud of it and can’t wait to wear it on a special occasion. 
 
I really wanted to put a lot of effort into making something for this challenge. I normally up cycle my current wardrobe and never really make anything from scratch. But this was the perfect opportunity for me to make my dream dress.
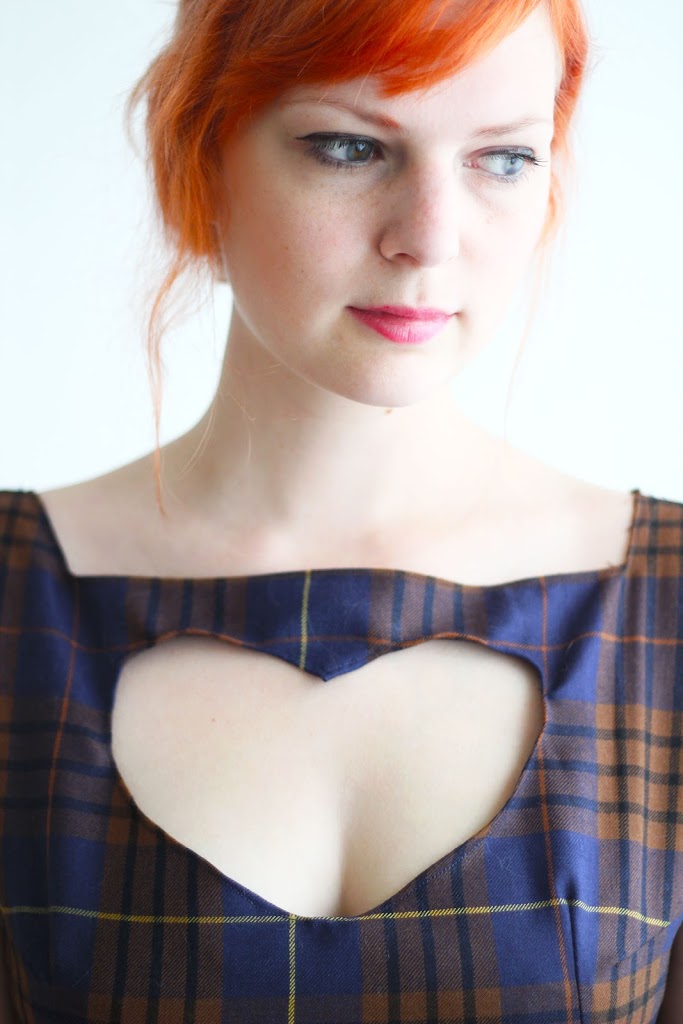
I was a little bit inspired by the 50s vogue dresses and I watched a lot of Mad Men (for all of you Mad Men fans, can’t you just see Peggy wearing a fabric pattern like this?!). I still wanted to give it a little edge and that is how I came up with the hart shape. You normally see this on the back of dresses, but I wanted to try something new and different.
 
I hope you like it!
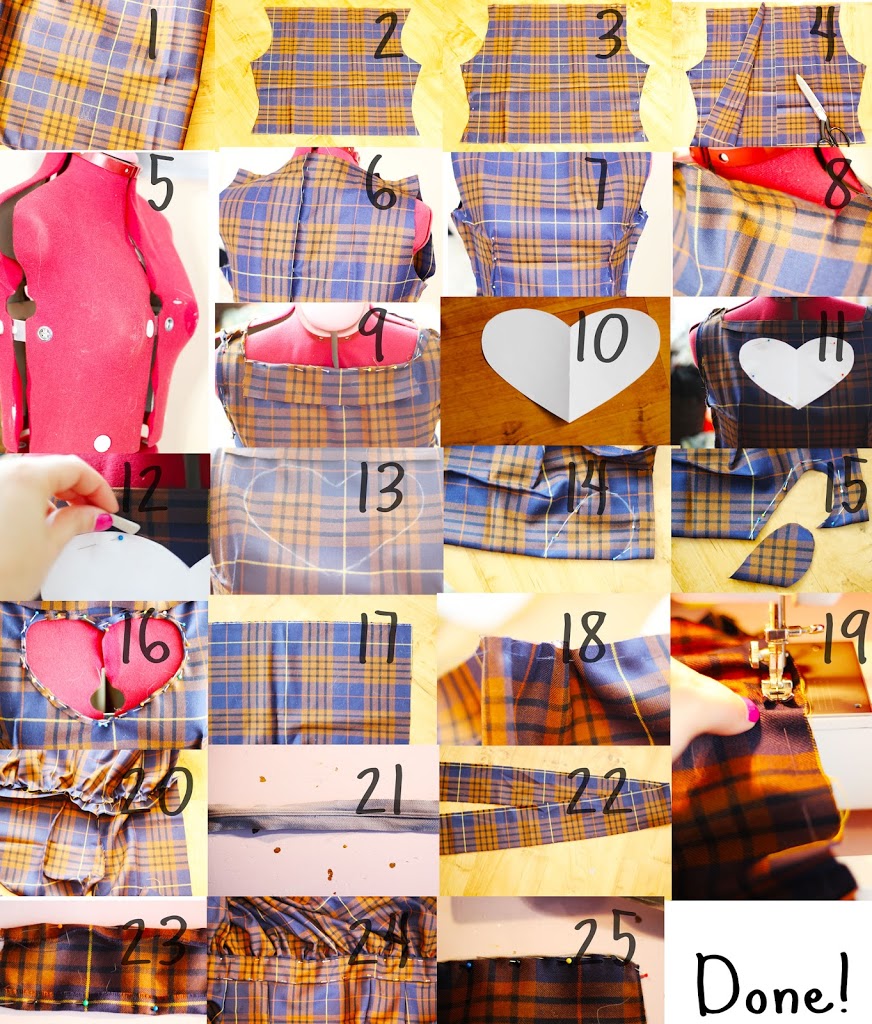
Besides wanting to make my dream dress, I also wanted to share the process with you! I didn’t use any patterns and probably didn’t do it the ‘normal’ way, but I managed and want to give you the opportunity to make you’re own heart dress.
 
1. Pick a fabric, I used about 2,5 by 2 meters. It all depends on how long you want you’re skirt to be and what dress size you are.
2. Cut out this shape twice, I just put a top(non stretch) over the fabric and cut round it.
3. Pin the sides and sew them together.
4. Cut the back right threw the middle.
5. Get a mannequin that is about you’re size. If you don’t have one you will have to put the piece on a couple of times to see if it fits alright. It will be a little bit more work, but it’s doable.
6. Pin the back together temporarily, and pin the shoulders parts.
7. This is a difficult part: Find the extra fabric under the breast area and pin it so it will be tight underneath. Do the same to the sides like in the picture. Stitch everything together.
8. Decide how broad you want you’re shoulder straps to be and cut 3 cm downwards. (see picture) Do tis to the front and back. 
9. Pin the flaps down and sew it together.
10. Cut out a hart out of paper.
11. Pin the hart to the dress where you want it to be positioned.
12. Get some chalk and draw around the paper onto the fabric.
13. This will be the size the hart will be.
14. Fold the fabric trough the middle and pin it so the hart is precisely through the middle.
15. Cut the hart out with 1 cm left all around.
16. Pin the ruffly parts and stitch them.
 
The top part is done! Take a cup of tea and relax, because you are almost done;)
 
17. Get the fabric for the bottom part.
18. Take a needle and threat and sew big stitches along the top of the fabric. Pull it tight enough until it is you’re waist size
19. Sew it, to make sure it will stay like that.
20. Sew the top part and the bottom part of you’re dress together.
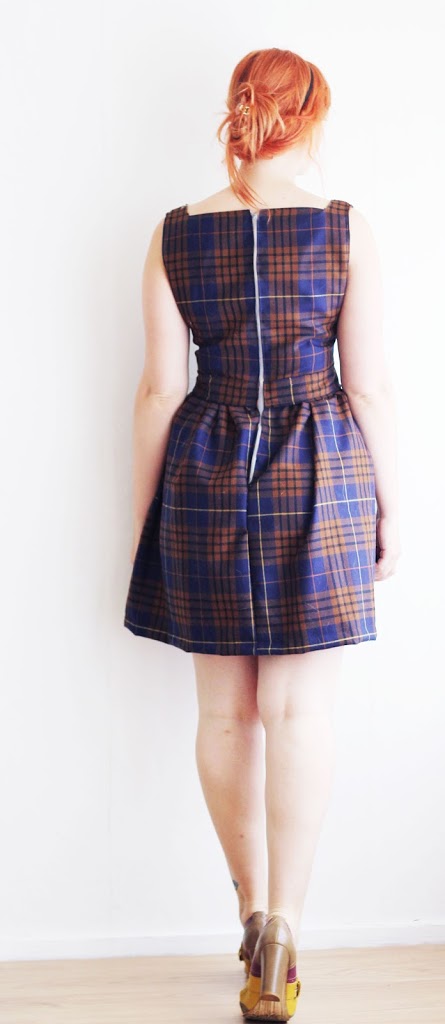
21. Get you’re zipper ready.
22. Take a long small piece of fabric.
23. Fold the bottom and top part inside out and stitch it.
24. Attach it onto the waist part of the dress with you’re sewing machine.
25. Put the zipper in. And fold the bottom part of you’re dress inside and stitch that.
 
Done!
 
I know it is a long process and I hope the tutorial is understandable. I just tried things as I went along, so if there is anything that needs more explaining just let me know!
 
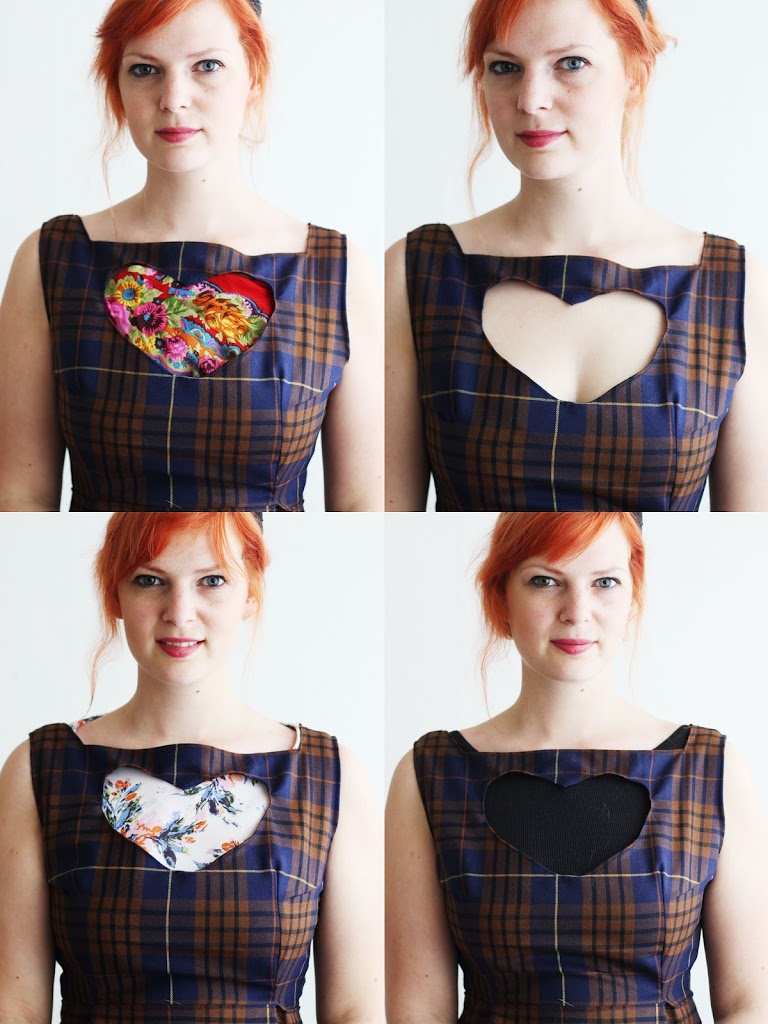
The heart shape can be a bit revealing, and although it can be sexy, you might not want to go grocery shopping that way;) That is why I tried shirts in different patterns to wear underneath it. This way the dress will get a different look every time!
 Pictures by Lana

Total
0
Shares
Share 0
Tweet 0
Pin it 0
Previous Article
  • Uncategorised

Sneak Peak into the Sewing Challenge

View Post
Next Article
  • Personal

My Newest Toy

View Post

Sign Up for the LRS Newsletter

Be the first to receive lots of crafty news!

Get ready for more creative articles:
But you don't look autistic at alll
View Post
  • Personal

PERSONAL | Grief and other things

STUDIO APARTMENT | House Tour
View Post
  • Personal
  • Video

VIDEO | STUDIO APARTMENT | Tiny House Tour

RESOLUTIONS | How I Went From Baby Spice to Sporty Spice with Yoga
View Post
  • Personal
  • Sponsored

RESOLUTIONS | How I Went From Baby Spice to Sporty Spice with Yoga

2016 | A Year in Pictures
View Post
  • Personal

2016 | A Year in Pictures

2016 | A Year in Pictures
View Post
  • Personal

Merry Christmas!

View Post
  • Personal

SHOP | The LRS Store

View Post
  • Berlin
  • Personal
  • Travel

PERSONAL | Berlin Update

View Post
  • Berlin
  • Personal
  • Travel

PERSONAL | (sort of) Moving To Berlin

24 comments
  1. Mammy Made says:
    31st May 2012 at 6:53 pm

    Oh.my.gosh! That is amazing!!!

    – Adele @ Mammy Made

    Reply
    1. Lana says:
      1st June 2012 at 8:10 am

      Thank you:)

      Reply
  2. Ricochet says:
    31st May 2012 at 7:36 pm

    Love it! Congrats on meeting this challenge. The design is great and you’ve matched up the plaid perfectly–not a small feat!

    Reply
    1. Lana says:
      1st June 2012 at 8:11 am

      Thank you Rikka, and thank you so much for organizing this event!

      Reply
  3. Melody Maj says:
    31st May 2012 at 9:38 pm

    Awesome Lana, I love it all, the style, the fabric, the heart cutout detail, well done to you :)

    Reply
    1. Lana says:
      1st June 2012 at 8:12 am

      Thank you!

      Reply
  4. Kristin G says:
    31st May 2012 at 11:08 pm

    Wowza!! You made that??? It’s amazing! Love it all and looks fabulous on you, great job!
    Kristin

    Reply
    1. Lana says:
      1st June 2012 at 8:13 am

      Thank you so much!And I also love you’re top!

      Reply
  5. Maha Lub says:
    1st June 2012 at 1:14 am

    wow!!! it’s so lovely, congrats!!!!

    Reply
    1. Lana says:
      1st June 2012 at 8:15 am

      Thank you!

      Reply
  6. leegetscrafty says:
    1st June 2012 at 4:20 am

    the heart cutout is so sweet :) great job!

    Reply
    1. Lana says:
      1st June 2012 at 8:16 am

      Thanks, The heart cutout wasn’t an easy job, put I am so glad I did it!

      Reply
  7. Sophia says:
    1st June 2012 at 6:30 am

    Really nice! Congratulations!

    Reply
    1. Lana says:
      1st June 2012 at 8:16 am

      Thank you Sophia!

      Reply
  8. Pam says:
    1st June 2012 at 2:48 pm

    Amazing job doing this without a pattern!!! The fit and style of the skirt is fabulous… it sits beautifully.

    Reply
    1. Lana Red says:
      3rd June 2012 at 3:28 pm

      Thank you! It was definitely a challenge to do this without a pattern, but thankfully it worked out!

      Reply
  9. Kei says:
    2nd June 2012 at 12:32 am

    WOW that looks utterly fabulous! Love it! :D

    Reply
    1. Lana Red says:
      3rd June 2012 at 3:28 pm

      Thank you :)

      Reply
  10. OneWord says:
    19th June 2012 at 4:57 pm

    So cute! Thanks for sharing!

    Reply
  11. Cirque du Quirks says:
    30th July 2012 at 11:42 pm

    That’s so cute! I’m in the middle of making a dress right now and have been tempted to take a pair of scissors and cut a heart in the front like yours for the majority of my project so far, but I think I’ll have to wait until next time. Thanks for posting this, I’m definitely going to look back to this for my next dress! :)
    -Chloe
    http://cirqueduquirks.blogspot.com/

    Reply
  12. Kate says:
    24th September 2012 at 6:22 pm

    Beautiful! And those colors look great on you! :)

    Reply
    1. Lana Red says:
      26th September 2012 at 6:31 pm

      Thank you for that great compliment!x

      Reply
  13. Erica says:
    9th December 2012 at 3:02 pm

    Lana, I saw you were following my boards and Pinterest and wanted to drop by and say ‘hello’. And, WOW, I’m so glad I did because your blog is amazing!! I’ve been browsing though your DIYs this morning and am feeling so inspired. I really love this adorable heart dress DIY. I’m hoping to get a sewing machine for Christmas and could use some sweet and easy sewing tutorials like this one. :)

    Reply
    1. Lana Red says:
      22nd December 2012 at 10:15 am

      Thank you for your kind comment! And a sewing machine sounds like a great christmas present :)

      Reply

Leave a Reply Cancel reply

Your email address will not be published. Required fields are marked *

ABOUTLRS
THE LRS NEWSLETTER
  • But you don't look autistic at alll
    PERSONAL | Grief and other things
  • JEWELRY DIY | Gold Leaf Teardrop Earrings
    JEWELRY DIY | Gold Leaf Teardrop Earrings
  • UPCYCLING DIY Old T-Shirt Hair Scrunchie
    UPCYCLING DIY | Old T-Shirt Hair Scrunchie
No, this is not a regular print, it's a puzzle that I framed!
Since 2 articles about my autism diagnosis came out, I gained new followers here on Instagram, welcome new friends!
I am in today's newspaper!! I talk about my autism diagnosis and why there should be more awareness for autism in women.
I wrote about it in my Instastories, so here it goes: I am having a bad month!
NEW ILLUSTRATION!
I just finished being interviewd for

Sign Up for the LRS Newsletter

Let's be friends!

  • Privacy Policy

Input your search keywords and press Enter.