I have seen many tutorials on making your own version of Mod Podge that I just had to try it myself. For those of you that don’t know what Mod Podge is: It’s a glue that is normally used for decoupaging, but a lot of crafters also use it for pretty much everything else, because it attaches on almost every surface giving a sheer finish.The down part of Mod Podge is, is that it’s kinda expensive. It’s not as expensive to not make me buy it, but for some projects I could use a cheaper version.
There are a lot of discussions going around saying that the homemade version is not the same thing as the ‘real deal’. And let me just be clear by saying that this is not the same as Mod Podge. It’s a formula that has similar qualities as the real recipe, but it’s not the same. I’ve read that the homemade version can give a yellow glow after a couple of years and doesn’t hold as long as the real podge.
This being sad, I still needed a cheap glue that’s similar to Mod Podge for my smaller projects. I wouldn’t use this for something that needs to stay intact for many years, but it would be great for experiments and low budget crafts.
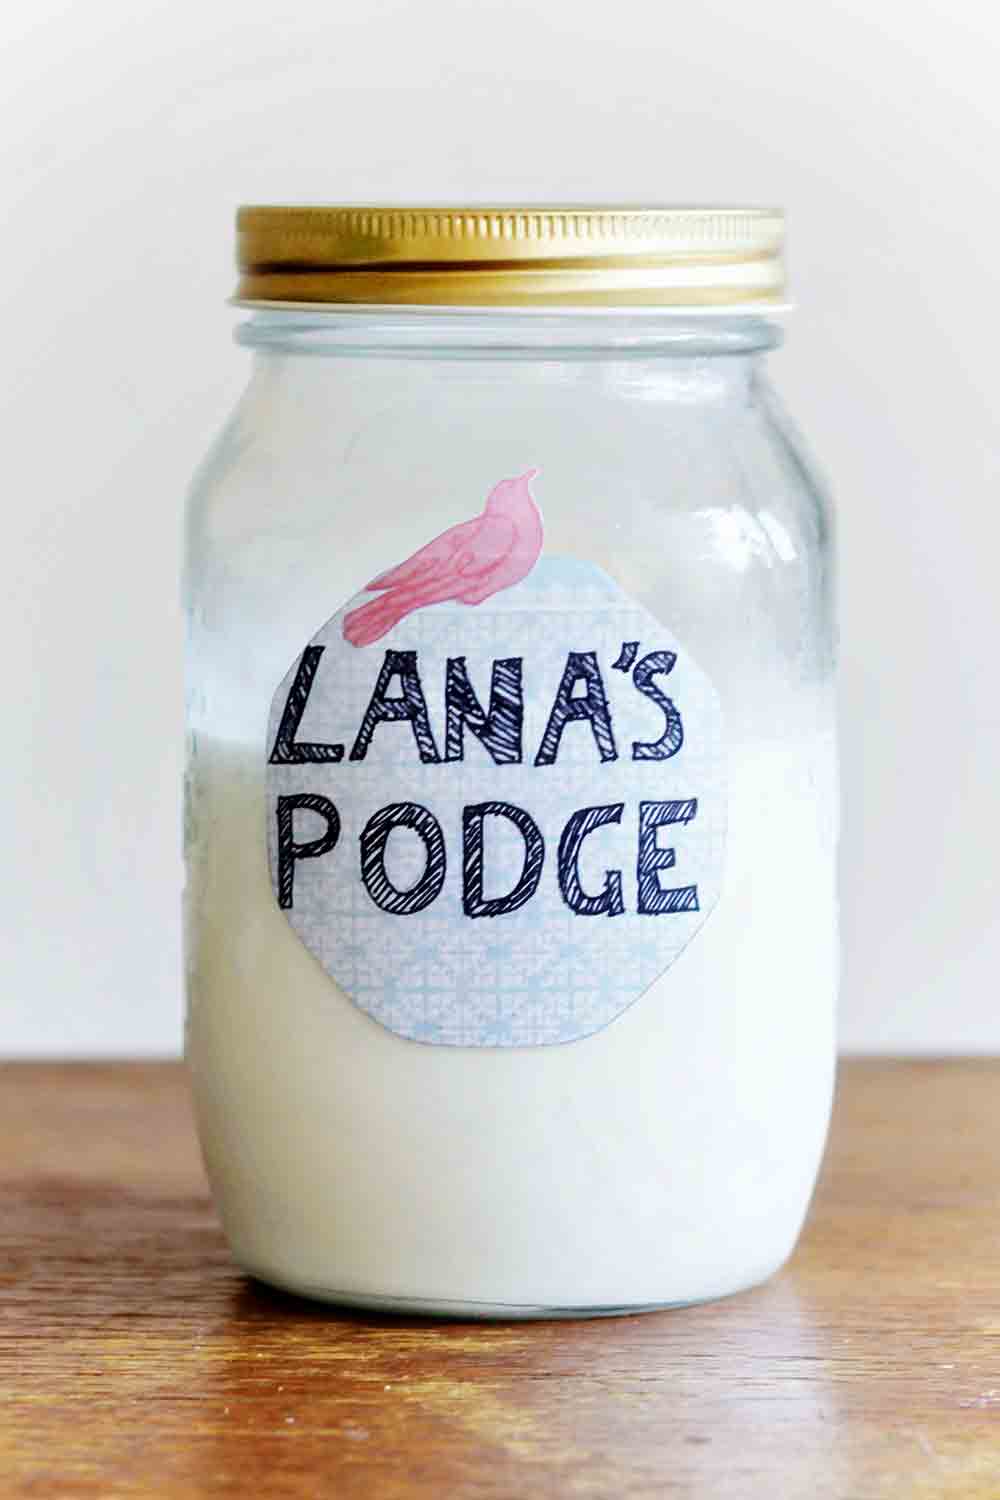
And to finish it of, I made a fun label and gave it my own name;)
Want to know how to make my homemade podge? Here’s how:
supplies for the podge: white glue (which is children’s glue, I bought it Hema) | Glass Jar | water
supplies for the label: Paper with a fun pattern | paint brush or sponge | Scissors | Pen
Podge DIY:
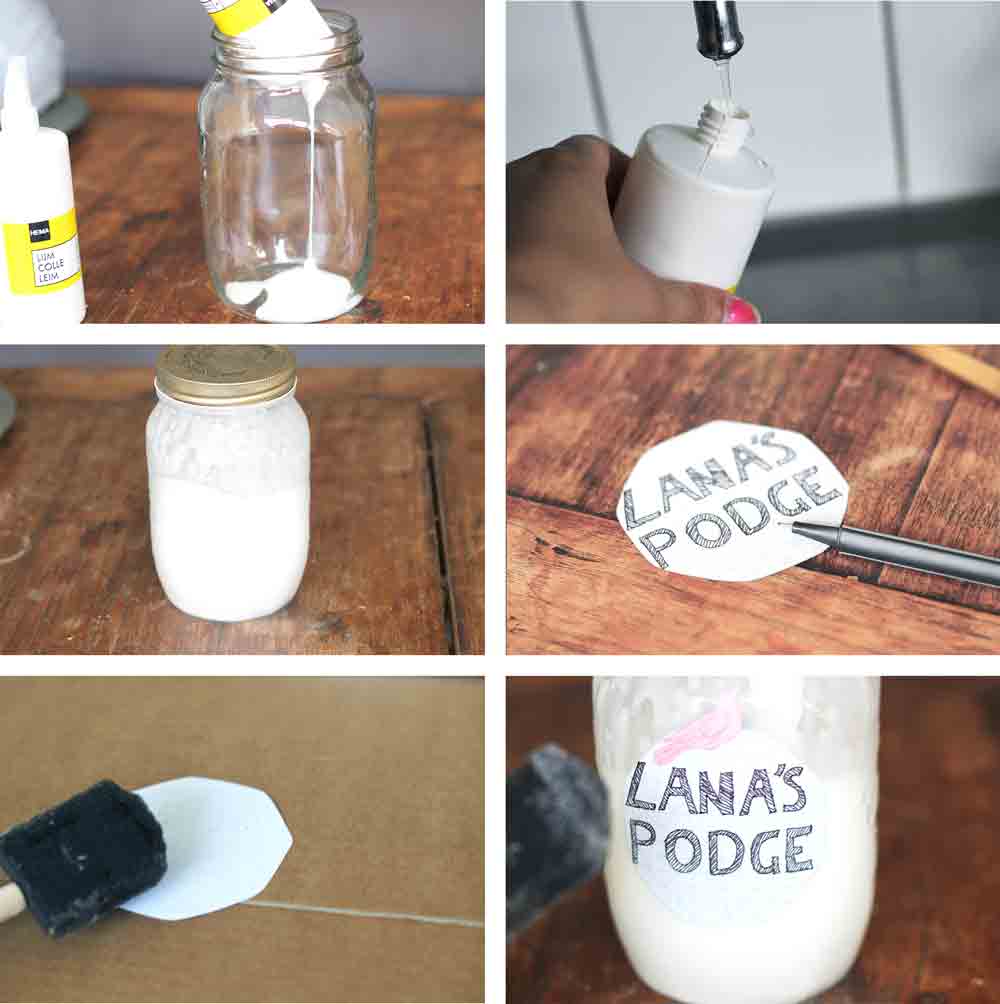
1. Take your white glue and pour it in the jar
2. Fill the glue container halfway with water. Add the water to the glue
3. Shake, shake, shake! And the podge is done!
2. Fill the glue container halfway with water. Add the water to the glue
3. Shake, shake, shake! And the podge is done!
Label DIY:
4. Cut a fun shape out of the paper. And write a fun titel on the label.
5. Dip your brush in the podge and apply it to the back of the label. Place the label on the jar. Let it dry. After it dried apply a layer of podge over the label to seal it.
4. Cut a fun shape out of the paper. And write a fun titel on the label.
5. Dip your brush in the podge and apply it to the back of the label. Place the label on the jar. Let it dry. After it dried apply a layer of podge over the label to seal it.
6. All done!


29 comments
I do this for my decoupage projects because modpodge is expensive
How great that you also use this method! And I agree Mod Podge can be expensive. xx
what would happen if you put an equal amount of store bought Hodge Podge and mixed them together?
Hi Joan, That is a very good question. To be honest, I have no idea what would happen.. I think it should work fine :)
I must try this!! Lovely tutorial… and lovely blog too ;)
Louise@loulovesthis
Thank you for your kind comment! And let me know how it worked out!
xx
how brilliantly simple! thank you! i will never go back to store bought.
ps. how gorgeous is your hair!?
xo
http://hersuitcaseheart.tumblr.com/
Thank you!xx
What ratio is the glue to water?
Hi! I used one part glue and half of that in water. Some people use the same amount of glue for the water, but my podge turned out to watery. I guess it all depends on the white glue you got. I suggest that you first put the glue in the jar and add the water bit by bit and see how the substance turns out, just in case.
I hope this helps. If you have any other questions, please feel free to ask!
xx Lana
Another alternative is to add water to your ModPodge to make it go further I generally make a ratio of 1:1 or something 2:1 water:ModPodge. It’s very forgiving and will accept a LOT of water with no negative effects in it’s use that I have notices.
That’s some great advice! Thank you! I will definitely try that. The only thing that I’m always worried about is making it to watery. Do you have any advice about that? xx
You should also add some sort of lacquer or varnish. Mod Podge also has a sealing agent like that. That’s why it is pricier.
Thank you for the advice! Do you have any experience with adding these materials to the podge? I am very curious about the result! Please let me know! xx
I had purchased a Mod-Podge with sparkle.It had blue and green sparkle to it.I am going to try making my own with a fine glitter.I am going to try your version of Podge soon when my bottle runs out.Thanks for posting:)
Briljant! En toevallig heb ik nog 5 potten hema lijm staan van een mislukt projectje. dank je!
Dan zit je de komende tijd in ieder geval nog zeker niet zonder podge ;)
I am doing my first “mod podge” type of project tonight and I was wondering if you had any advice. I am going to use this due to not wanting to spend all the money on mod podge. I am really hoping it works, but I was reading another tutorial like this and there were a ton of “waste of time and money” comments on it. Have you used it for anything else? Did you have any issues with it?
Hi, I have used my home podge for some smaller projects and it worked fine. But I don’t know how it works out on the long run. I do suggest that you use the ‘real deal’ on bigger projects. But from my own experience , I should say that the white glue is very inexpensive and for me it was worth the try.
I hope this helps, let me know how it worked out!
xx Lana
LOVE it! I can say with experience that I used this procedure years ago on a mosaic of eggshells. It has lasted 12 years. Worth the time and saved expense. Have not used it on Large projects and eggshells are light weight. Still none of the pieces have come off. You can see a pic here of it.
http://thecraftyrecycler.blogspot.com/2012/04/moms-podge-and-pinterest.html
I also used it recently when covering a cardboard shelf with pattern paper.
http://thecraftyrecycler.blogspot.com/2012/07/from-keyboard-boxes-to.html
It worked very well indeed! I love seeing posts like this one spreading the word on how to save a penny here and there. KUDO’s Lana!
How good to hear that it works, and can last for 12 years! Thank you so much for the comment!x
muy bueno el consejo. nosotras queremos hacer una pieza con la técnica del decoupage, pero la cola real es muy cara. probaremos con tu consejo. gracias.
You might want to take into account that most white glues are acidic. If your project uses important items you want to preserve for many, many years, you’ll be better off using acid-free products. Acid will destroy your pretty things over time. :(
I made the podge and after it dries,glaze it and looks beautiful and shiny and will also conserve your precious art.
How great that you made it! And that it’s looking good!
Just found this. I’ve been using white glue for years and never tried Mod Podge. Thought it was the same thing. I’ve just always known my little projects can’t go in the dishwasher. :)
well, the tutorial shows that it’s kind of the same thing, but just with water. So you where actually ahead on all of us! ;)
Hi! I learned about Mod Podge just last year and unluckily there are none sold here in my place. Thus, did some research and yes found out alternative ways to do a podge. Still, put off for a while doing crafts and just today I decided to pursue it again. And thank you since I came across your page today and will certainly do what I’ve been wanting to do now. I don’t know if I am really and artistic person but I do like to keep my hands busy on tiny details. Again, thank you and wish me luck! :) ~Nonie~
Hi Nonie! Sorry that the response is so late. I hope that your project went well and that the homemade podge did it’s work! Have a lovely day!xx