LRS
  • START HERE
  • DIY
    • SEWING & STYLE
    • HOME DECOR
    • JEWELRY
    • TECH DIY
    • ANIMAL
    • ROUNDUPS
    • CHRISTMAS CRAFTS
  • FASHION
    • NAIL DESIGN
    • HAIR
    • MAKE-UP
    • OUTFITS
    • FASHION INSPIRATION
    • TIPS & ADVICE
  • RECIPES
    • BREAKFAST
    • DESSERTS
    • TREATS
    • SAVORY
  • TRAVEL
    • TRAVEL
    • BERLIN GUIDE
  • INSPIRED
    • ART
    • BLOGGING
    • PERSONAL
  • ABOUT
    • CONTACT
  • SHOP
  • START HERE
  • ABOUT
  • CONTACT
  • SHOP
L A N A R E D S T U D I O
  • CRAFTS

    SEWING & STYLE

    HOME DECOR

    JEWELRY

    ROUNDUPS

    TECH DIY

    CHRISTMAS CRAFTS

    ANIMAL

    UPCYCLING

    HOME DECOR

    SMALL STUDIO APARTMENT | 10 Tips, Tricks and Ideas to Maximize Your Space

    TECH DIY

    DIY | Card Holder Phone Case

    JEWELRY

    JEWELRY DIY | Gold Leaf Teardrop Earrings

  • FASHION

    OUTFITS

    HAIR

    MAKE UP

    NAIL DESIGN

    FASHION INSPIRATION

    TIPS & ADVICE

    HAIR STYLES

    HAIR DIY VIDEO | Braided Scarf Hairstyle

    NAIL DESIGN

    NAIL DIY | It's a Glittery Sharpie Christmas

    Outfits

    OUTFIT | Autumn, Me & My Tripod

  • RECIPES

    DESSERTS

    SAVORY

    TREATS

    BREAKFAST

    BREAKFAST

    RECIPE | Sugar Free - Banana Bread

    TREATS

    RECIPE | Courgette Chips

    SAVORY

    RECIPE | Sweet Potato & Goat's Cheese Tart

  • INSPIRED

    ART

    BLOGGING

    PERSONAL

    BLOGGING

    HOW TO | 10 PRACTICAL Tips Every Blogger Should Learn

    PERSONAL

    PERSONAL | Grief and other things

    ART

    DIY | Double Exposure Photography

  • TRAVEL

    Berlin

    TRAVEL | BERLIN GUIDE

    Travel

    LIVING ABROAD | How to Make Your Temporary Home Feel Like Home

    explore

    TRAVEL

    BERLIN GUIDE

  • Home Decor
  • Upcycling

Pallet Table DIY

Total
29
Shares
2
0
27
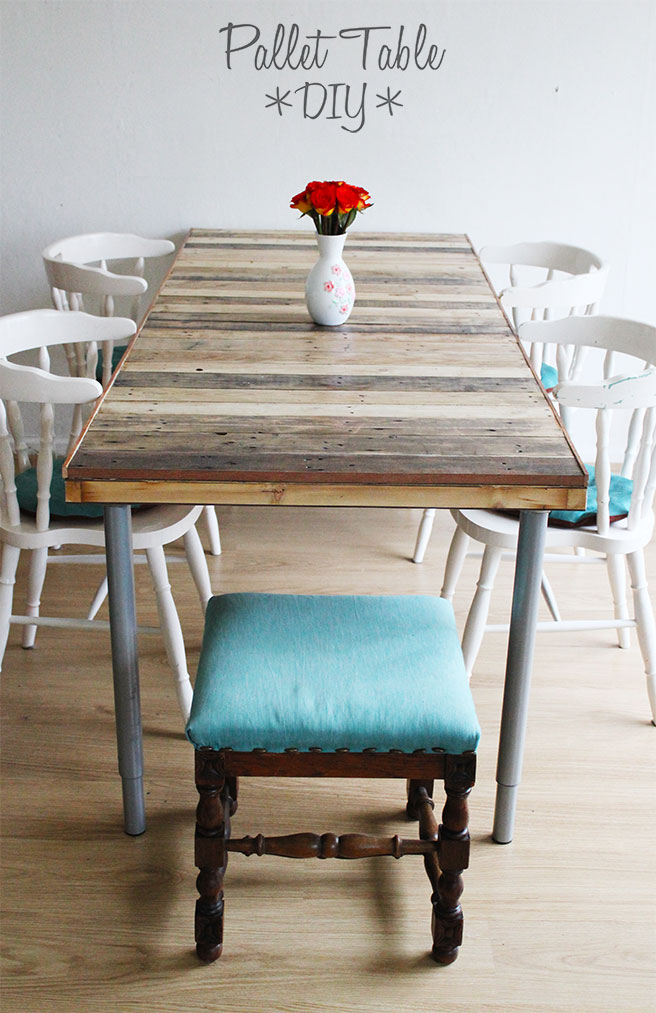
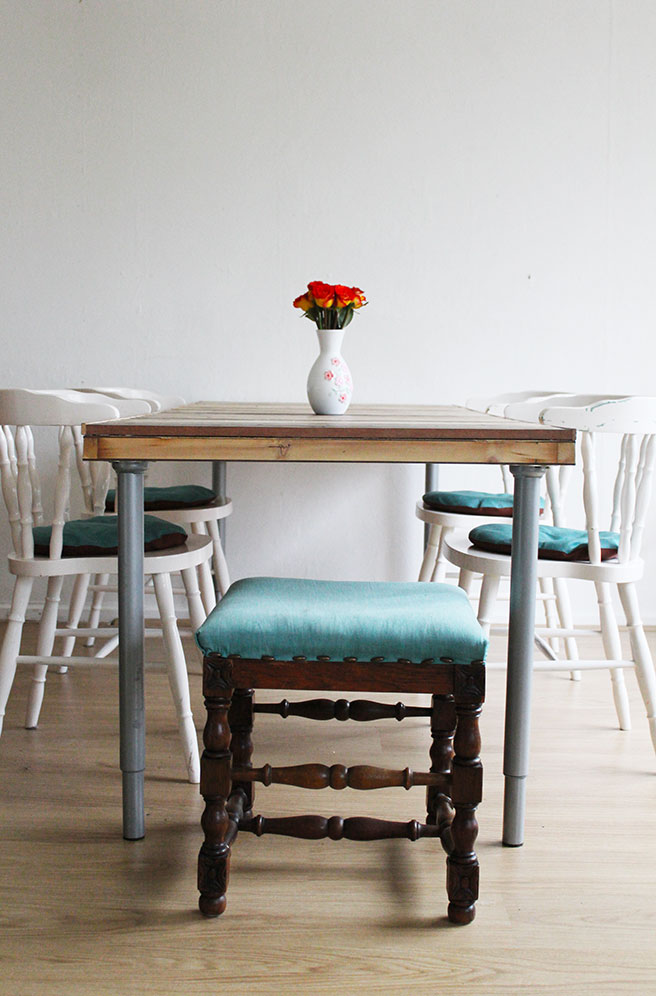
Here’s a fun project that my boyfriend did, that I would like to share with you. He really wanted to make a dining table by only using ‘leftover’ materials. I really liked this idea and decided to document the project and turn it into a DIY for you :)
The table turned out great, and I really love the rustic and handmade look to it, and the process was actually very easy.
Here’s how:

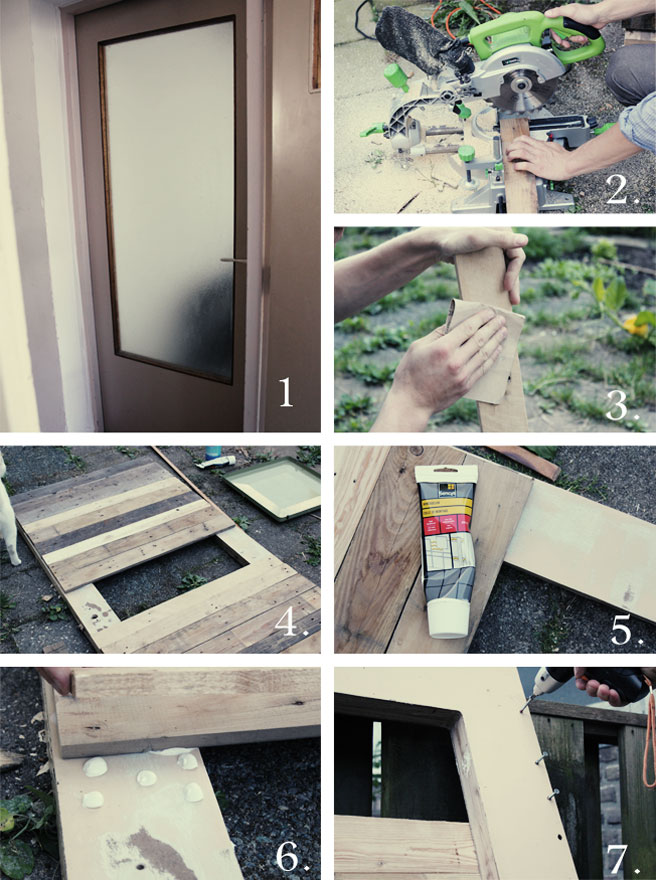
1. Collect about 8 single use pallets and strip them. The actual amount of pallets depends on the amount of usable planks. Often they are rotten or broken. You can find them around construction works. Or ask for them at a DIY store. Select the pallets by its planks. They can vary in type of wood, width and length but the thickness should be similar. 
1.2 Find an old door and strip it. I took an unused door from our house. 
1.3 Choose a design: I decided that I also wanted to use the frames from the window in the door to serve as a border over the length of the table.  
2. Saw all planks on the width of the door. (or width of the door minus the width of the frames if you use them)
3. Sand all the planks.
4+5 Lay the door flat on the floor and decide in which order you want to put them. I did it kind of randomly and moved a few here and there to get some nice contrasts in textures. 
6+7. Screw the planks on the door from behind. (as you can see on picture 6, I first tried to glue them but that didn’t work)
– Use a belt sander to smooth the planks and the sides of the table. 
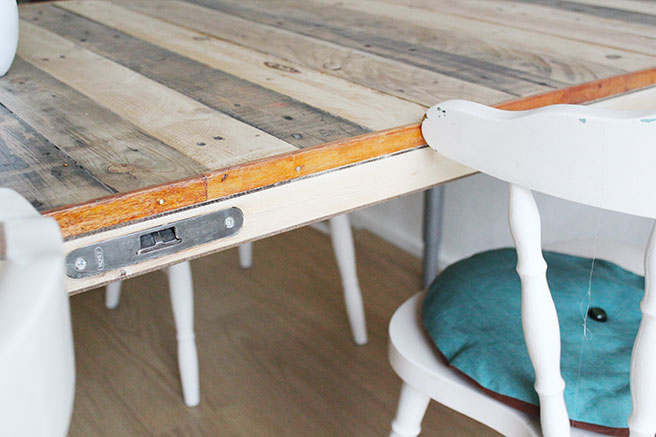
– If you use a border: apply it to the side with small nails.
– Finish the table with a varnish. 

Find some old (or new) table legs, apply them under the table, and your pallet door table is finished!

I found the telescopic legs at some rubbish heap. I think they are from Ikea. 

**Note** As a lot of planks are often far from perfect, you will probably end up with a couple of gaps in between them. I’m still working on a final solution, and currently I’m doing some tests with applying gluegun glue.
But I might use epoxy in the end.  

Total
29
Shares
Share 2
Tweet 0
Pin it 27
Previous Article
  • Recipes
  • Savory

RECIPE | Pumpkin Soup

View Post
Next Article
  • Personal

Advertise on Lana Red!

View Post

Sign Up for the LRS Newsletter

Be the first to receive lots of crafty news!

Get ready for more creative articles:
UPCYCLING DIY Old T-Shirt Hair Scrunchie
View Post
  • DIYit/BUYit
  • Sewing & Style
  • Upcycling

UPCYCLING DIY | Old T-Shirt Hair Scrunchie

DIY | Card Holder Phone Case
View Post
  • Sewing & Style
  • Tech DIY
  • Upcycling

DIY | Card Holder Phone Case

SMALL STUDIO APARTMENT | 10 Tips, Tricks and Ideas to Maximize Your Space
View Post
  • Home Decor

SMALL STUDIO APARTMENT | 10 Tips, Tricks and Ideas to Maximize Your Space

HANGING PLANTER DIY | From Sifter to Planter
View Post
  • Home Decor
  • Upcycling

HANGING PLANTER DIY | From Sifter to Planter

RESTYLE DIY | Custom Sofa Fabric Design
View Post
  • Home Decor
  • Rijksstudio
  • Sponsored
  • Upcycling

RESTYLE DIY | Custom Sofa Fabric Design

DIY | Candle Wax Table Lamp
View Post
  • Home Decor
  • Upcycling

DIY | Candle Wax Table Lamp

ART DIY | Handmade Collage Greeting Card
View Post
  • DIYit/BUYit
  • Home Decor
  • Tech DIY

ART DIY | Handmade Collage Greeting Card

DIY | How to Restyle a Plain Cupboard
View Post
  • Home Decor
  • Upcycling

DIY | How to Restyle a Plain Dresser

13 comments
  1. Nathalia says:
    17th February 2013 at 11:16 pm

    What an awesome project! I love that the frame is an old door. About the gaps: Have you tried mixing wood glue with sawdust to create a paste and then fill the gaps with it? It worked pretty well on my table renovation. Obviously you have to varnish over it, since its not very scratch proof, but it looks like part of the wood after a while and can even be stained.

    Reply
  2. Monica @ mon makes things says:
    10th March 2013 at 9:20 pm

    Oh my goodness… I LOVE this!! I’m currently in the (slow) process of building a couch from pallets… This table is so creative & clever!

    I just found your blog and I’m loving it! :)
    ♥♥Monica
    monmakesthings

    Reply
    1. Lana Red says:
      13th March 2013 at 8:18 pm

      Thank you! I will let the boyfriend know you like his table ;)

      And good luck with you couch!

      Reply
  3. Caitlin says:
    9th May 2013 at 6:12 pm

    It turned out beautifully! I recovered my old coffee table with pallet boards and I love it but I would die to have this in my kitchen!

    Reply
  4. Sarah Powell says:
    22nd May 2013 at 4:59 pm

    What stain did you use on the sides of the table? The border of the door? I love the bright color! :) And this overall!

    Thanks!

    Reply
    1. Lana Red says:
      27th May 2013 at 10:44 pm

      Yes! It’s the border of the window of the door:)

      Reply
  5. Pingback: 5 Most amazing DIY Pallet Projects ever!!! • DIY All in One
  6. Pingback: Main Ingredient Monday-20 Kitchen Table Sets
  7. Pingback: 10 Wonderful DIY Dining Table Ideas
  8. Pingback: 10 Creative Ways to Use Recycled Pallets to Decorate Your Home • 1001 Pallets
  9. Pingback: Bricolaje: 5 DIY hechos con palets para tu cocina
  10. Pingback: 10 Imaginative Methods To Use Recycled Pallets To Embellish Your Household
  11. Pingback: Small Dining Table Ideas for Tiny Spaces | Interior Design Blogs

Leave a Reply Cancel reply

Your email address will not be published. Required fields are marked *

ABOUTLRS
THE LRS NEWSLETTER
  • But you don't look autistic at alll
    PERSONAL | Grief and other things
  • JEWELRY DIY | Gold Leaf Teardrop Earrings
    JEWELRY DIY | Gold Leaf Teardrop Earrings
  • UPCYCLING DIY Old T-Shirt Hair Scrunchie
    UPCYCLING DIY | Old T-Shirt Hair Scrunchie
One of my fav projects! The Origami Swan Brooch, made out of copperplate. It’s such a simple, yet unique item. Check out the blogs archive for the full tutorial!
BOOKSWAP! (For now, this is for all Dutch based friends)
The Dutch COVID lockdown has been extended for another 3 weeks. I am lucky to still have steady work as a freelancer and I know that it is hard on so many people, but let's all stay safe and take this serious.
NEW ILLUSTRATION • This time it's a personal one: A drawing of my sister Kelly, who passed away last year.
NEW ILLUSTRATION! • This time it is Christmas themed. Hurray!
It's official: we, the cheese loving Dutchies are in Covid lockdown.

Sign Up for the LRS Newsletter

Let's be friends!

  • Privacy Policy

Input your search keywords and press Enter.