LRS
  • START HERE
  • DIY
    • SEWING & STYLE
    • HOME DECOR
    • JEWELRY
    • TECH DIY
    • ANIMAL
    • ROUNDUPS
    • CHRISTMAS CRAFTS
  • FASHION
    • NAIL DESIGN
    • HAIR
    • MAKE-UP
    • OUTFITS
    • FASHION INSPIRATION
    • TIPS & ADVICE
  • RECIPES
    • BREAKFAST
    • DESSERTS
    • TREATS
    • SAVORY
  • TRAVEL
    • TRAVEL
    • BERLIN GUIDE
  • INSPIRED
    • ART
    • BLOGGING
    • PERSONAL
  • ABOUT
    • CONTACT
  • SHOP
  • START HERE
  • ABOUT
  • CONTACT
L A N A R E D S T U D I O
  • CRAFTS

    SEWING & STYLE

    HOME DECOR

    JEWELRY

    ROUNDUPS

    TECH DIY

    CHRISTMAS CRAFTS

    ANIMAL

    UPCYCLING

    HOME DECOR

    UPCYCLING DIY | Decoupage Lampshade, with paper napkins

    TECH DIY

    DIY | Card Holder Phone Case

    JEWELRY

    JEWELRY DIY | Polymer Clay Flower Earrings

  • FASHION

    OUTFITS

    HAIR

    MAKE UP

    NAIL DESIGN

    FASHION INSPIRATION

    TIPS & ADVICE

    HAIR STYLES

    HAIR DIY VIDEO | Braided Scarf Hairstyle

    NAIL DESIGN

    NAIL DIY | It's a Glittery Sharpie Christmas

    Outfits

    OUTFIT | Autumn, Me & My Tripod

  • RECIPES

    DESSERTS

    SAVORY

    TREATS

    BREAKFAST

    BREAKFAST

    RECIPE | Sugar Free - Banana Bread

    TREATS

    RECIPE | Courgette Chips

    SAVORY

    RECIPE | Sweet Potato & Goat's Cheese Tart

  • INSPIRED

    ART

    BLOGGING

    PERSONAL

    BLOGGING

    HOW TO | 10 PRACTICAL Tips Every Blogger Should Learn

    PERSONAL

    PERSONAL | Grief and other things

    ART

    DIY | Double Exposure Photography

  • TRAVEL

    Berlin

    TRAVEL | BERLIN GUIDE

    Travel

    LIVING ABROAD | How to Make Your Temporary Home Feel Like Home

    explore

    TRAVEL

    BERLIN GUIDE

  • Christmas Crafts
  • Home Decor

CHRISTMAS DIY | Minimal Chalkboard Tree

Total
38
Shares
0
0
38
One week until christmas and no tree yet? Oh no! (*update*- I wrote this post in 2014, but I have remade this tree every year since, you can view last years design in the bottom of this post)
 
It’s a good thing that I am just like you and really didn’t feel like dragging a tree to my house, or worse: decorate my extremely-non-realistic-looking-tiny-fake-christmas-tree.
 

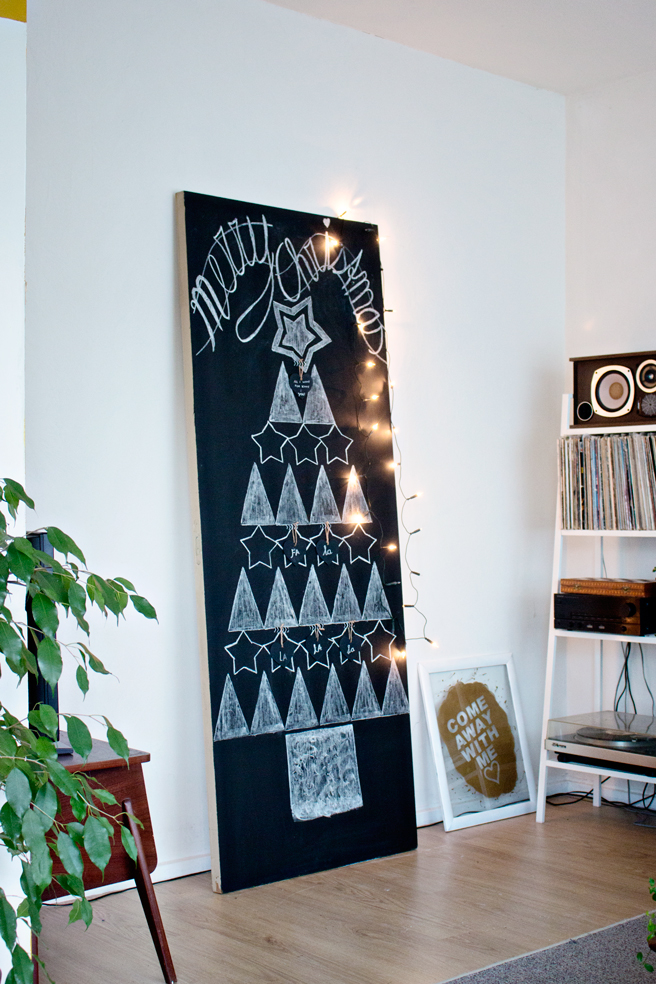
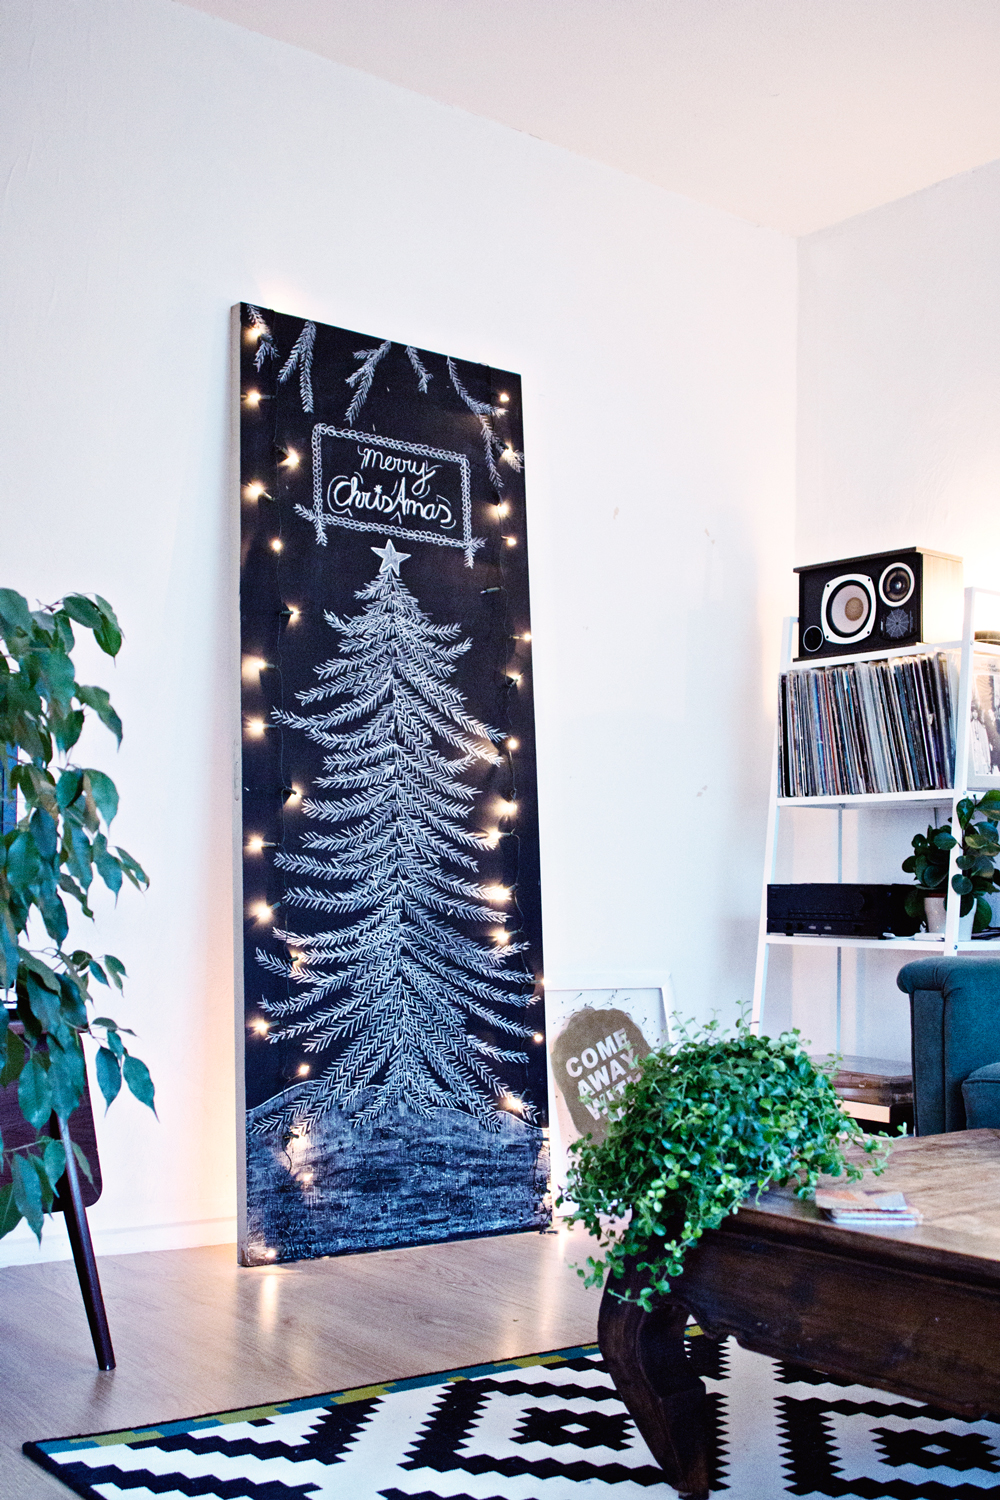
This year, I choose to be extremely crafty and minimal when it came to my christmas tree idea. It was very easy actually I just (temporarily) removed the door from our storage closet and decided to paint one side with chalkboard paint, easy!
 
And yes, you read it right. I simply placed the door against a big empty wall, and what do you know: it actually looks pretty christmassy in my living room right now!
 
It’s of course not necessary to use an old door, you can also use a big piece of wood, or a small one. The idea is, that it’s a flat surface and it doesn’t take up too much space or precious time to make (perfect for tiny apartments!). And after looking at it for a long time during christmas, you end up with a nice chalkboard door in your cupboard, that is perfect for writing down lists!
 
* As a side note, I can hear you thinking: but than my storage won’t have a door! Solution: I actually hung up a temporary curtain and it doesn’t look too bad:)
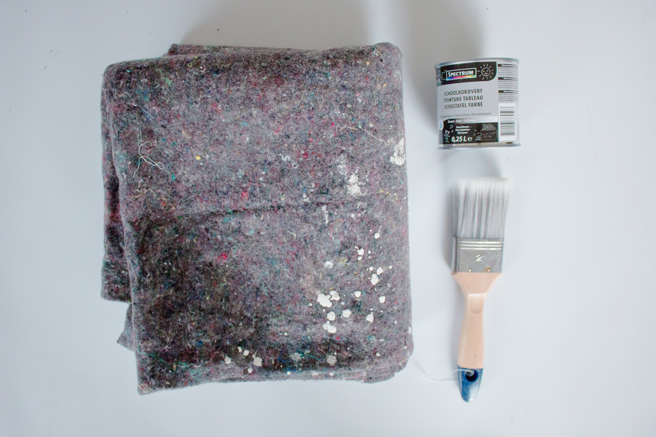
 
Supplies:
– Old door, or big/small/old/new piece of wood
– Chalkboard Paint
– Paint Brush
– Painters Cloth
– Chalk
* optional: Decorations
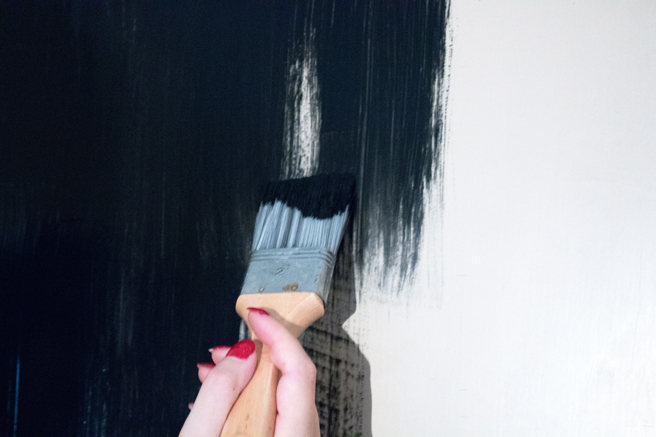
– Clean the door and place the painters cloth underneath. Apply a thin layer of chalkboard paint. Let it dry (mine only took an hour to dry, before I could paint it over)
– Apply a second layer of paint. Let it dry overnight.
Let’s decorate!
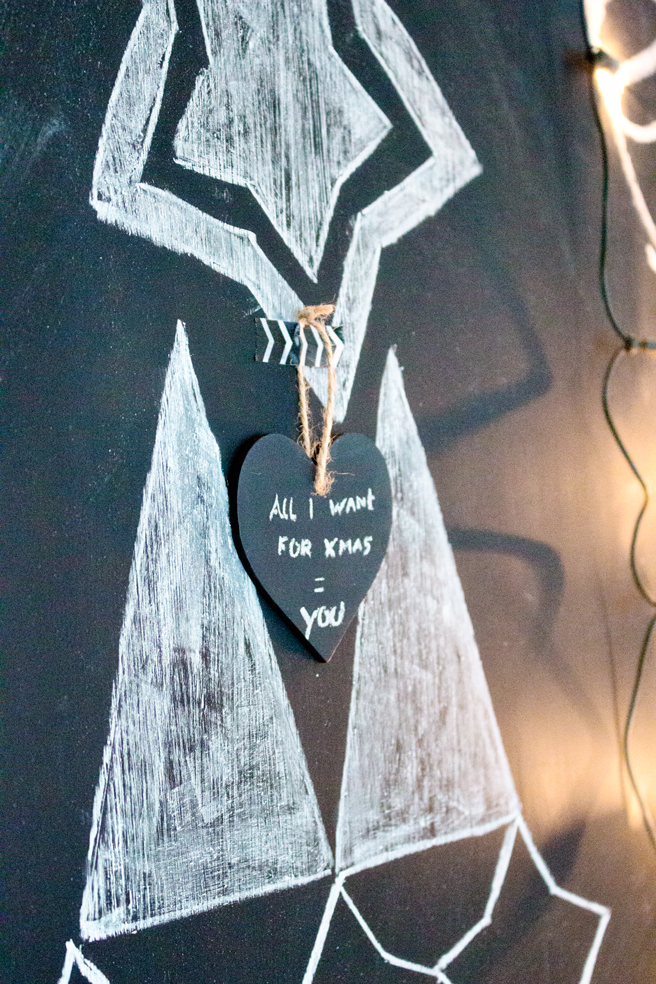
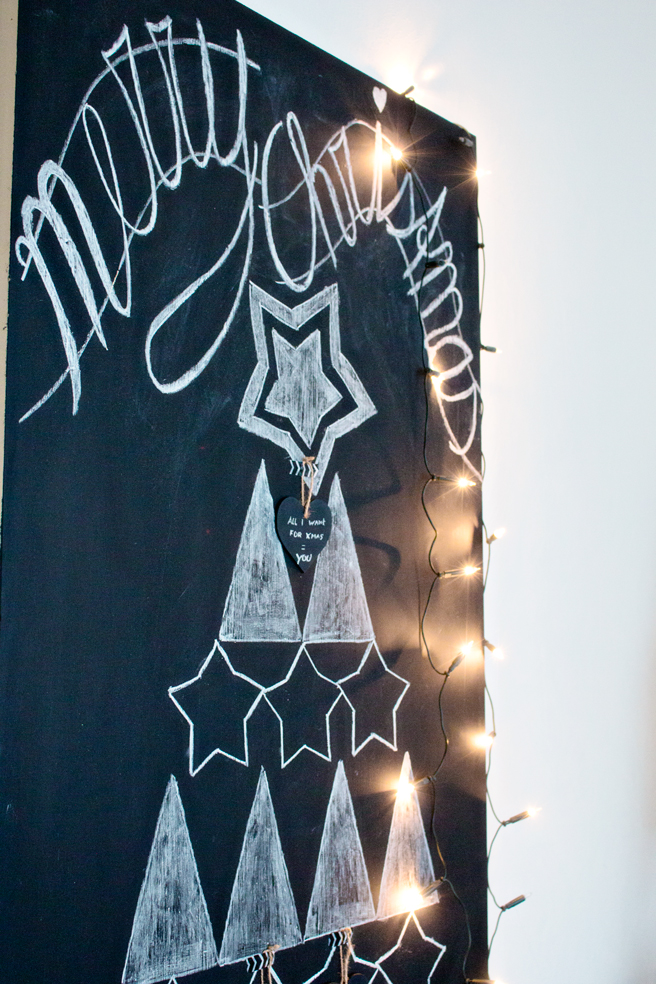
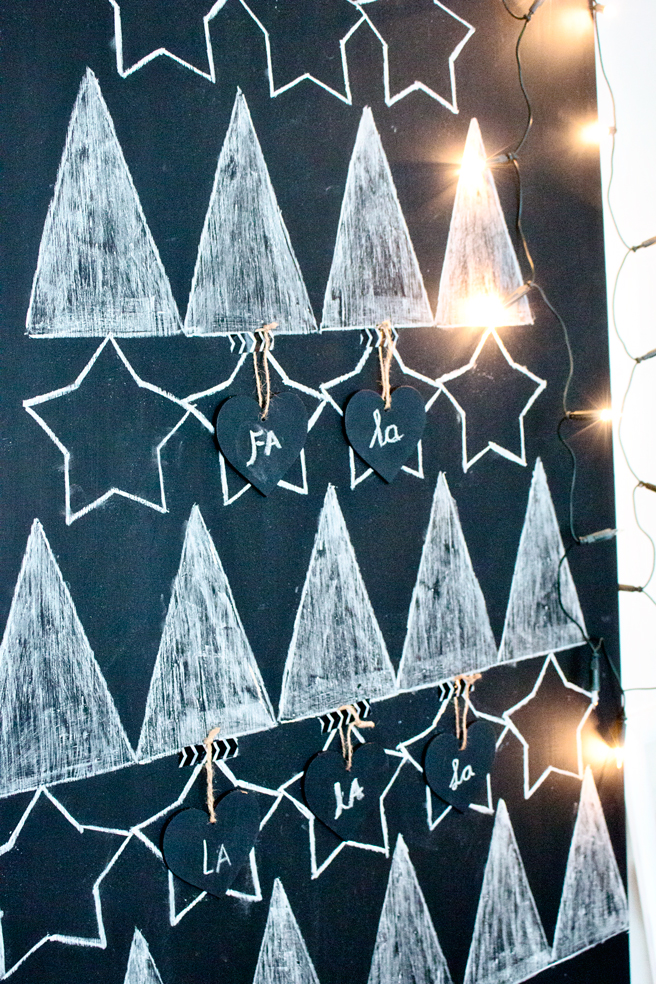
– I cutout some shapes out of paper and traced those to create the tree. 
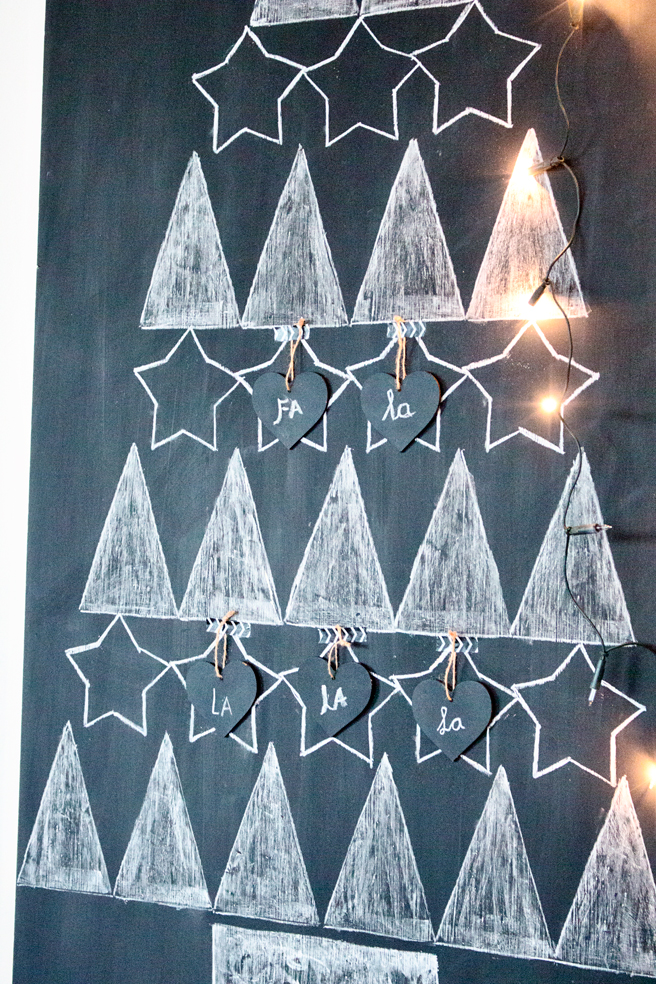
– You can use tape or small nails to hang decorations “in” the tree, or simply hang them on the top corner of the door, like I did with my christmas lights.
– If you have some chalkboard paint leftover, you can use it to paint decorations and create a three dimensional chalkboard effect.
 
We unfortunately don’t celebrate christmas with gifts, but the floor in front of this minimal tree would be perfect for a big stack of pretty wrapped presents!


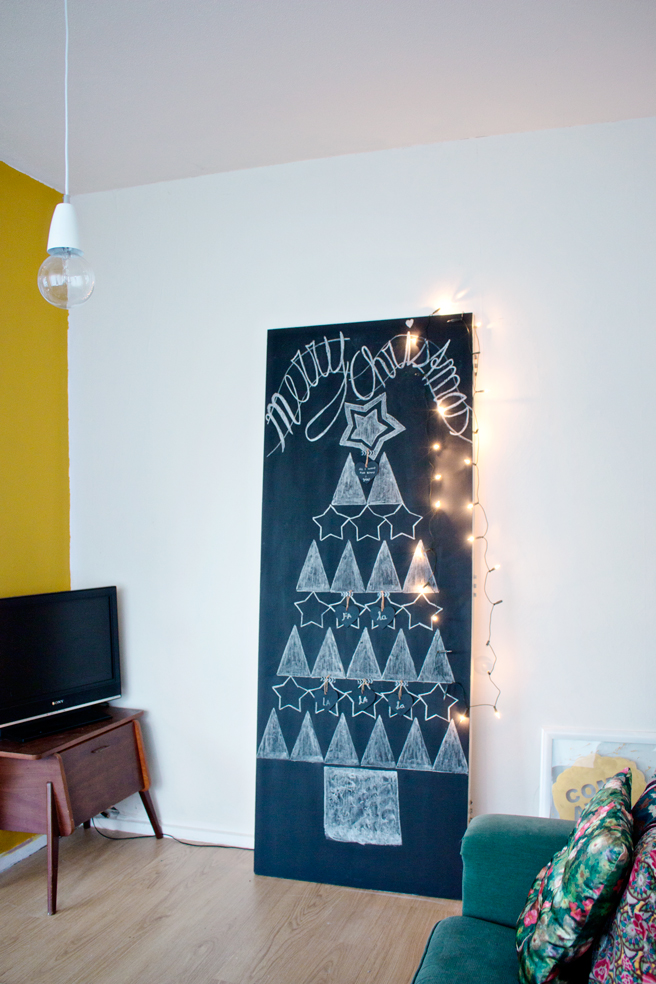
And  since the Christmas tree worked out so well the next year, I decided to use the same context but mixed it up with a new chalk design:

DIY | Chalkboard Christmas Tree


Total
38
Shares
Share 0
Tweet 0
Pin it 38
Previous Article
  • Beauty
  • Nail

NAIL DIY | It’s a Glittery Sharpie Christmas

View Post
Next Article
  • Personal

A BRAND NEW LANA RED STUDIO!

View Post

Sign Up for the LRS Newsletter

Be the first to receive lots of crafty news!

3 comments
  1. Rachel Baumann - Fifty Two Weekends says:
    20th December 2014 at 2:40 pm

    LOVE this!

    Reply
  2. Roxy! says:
    27th August 2016 at 12:35 pm

    This is PERFECT for me! After Christmas this would make a great message center board :) …thanks for fabulous inspiration xx

    Reply
    1. Lana Red says:
      31st August 2016 at 9:32 am

      Hi Roxy! Thank you for your kind words! And a message board is an excellent idea! I would always put the door back into the storage cupboard (which is where I removed it from and temporarily replaced it with a sheet ;) And I would use the chalkboard for lists and chores. it worked great and it was perfectly hidden on the inside of the cupboard. x

      Reply

Leave a Reply Cancel reply

Your email address will not be published. Required fields are marked *

THE LRS NEWSLETTER
  • JEWELRY DIY | Polymer Clay Flower Earrings
  • DIY Decoupage Lampshade
    UPCYCLING DIY | Decoupage Lampshade, with paper napkins
  • JEWELRY DIY | Beaded daisy flower for Necklaces, Earrings and Bracelets
    JEWELRY DIY | Beaded daisy flower for Necklaces, Earrings and Bracelets

Sign Up for the LRS Newsletter

Let's be friends!

  • Privacy Policy

Input your search keywords and press Enter.