LRS
  • START HERE
  • DIY
    • SEWING & STYLE
    • HOME DECOR
    • JEWELRY
    • TECH DIY
    • ANIMAL
    • ROUNDUPS
    • CHRISTMAS CRAFTS
  • FASHION
    • NAIL DESIGN
    • HAIR
    • MAKE-UP
    • OUTFITS
    • FASHION INSPIRATION
    • TIPS & ADVICE
  • RECIPES
    • BREAKFAST
    • DESSERTS
    • TREATS
    • SAVORY
  • TRAVEL
    • TRAVEL
    • BERLIN GUIDE
  • INSPIRED
    • ART
    • BLOGGING
    • PERSONAL
  • ABOUT
    • CONTACT
  • SHOP
  • START HERE
  • ABOUT
  • CONTACT
  • SHOP
L A N A R E D S T U D I O
  • CRAFTS

    SEWING & STYLE

    HOME DECOR

    JEWELRY

    ROUNDUPS

    TECH DIY

    CHRISTMAS CRAFTS

    ANIMAL

    UPCYCLING

    HOME DECOR

    SMALL STUDIO APARTMENT | 10 Tips, Tricks and Ideas to Maximize Your Space

    TECH DIY

    DIY | Card Holder Phone Case

    JEWELRY

    JEWELRY DIY | Gold Leaf Teardrop Earrings

  • FASHION

    OUTFITS

    HAIR

    MAKE UP

    NAIL DESIGN

    FASHION INSPIRATION

    TIPS & ADVICE

    HAIR STYLES

    HAIR DIY VIDEO | Braided Scarf Hairstyle

    NAIL DESIGN

    NAIL DIY | It's a Glittery Sharpie Christmas

    Outfits

    OUTFIT | Autumn, Me & My Tripod

  • RECIPES

    DESSERTS

    SAVORY

    TREATS

    BREAKFAST

    BREAKFAST

    RECIPE | Sugar Free - Banana Bread

    TREATS

    RECIPE | Courgette Chips

    SAVORY

    RECIPE | Sweet Potato & Goat's Cheese Tart

  • INSPIRED

    ART

    BLOGGING

    PERSONAL

    BLOGGING

    HOW TO | 10 PRACTICAL Tips Every Blogger Should Learn

    PERSONAL

    PERSONAL | Grief and other things

    ART

    DIY | Double Exposure Photography

  • TRAVEL

    Berlin

    TRAVEL | BERLIN GUIDE

    Travel

    LIVING ABROAD | How to Make Your Temporary Home Feel Like Home

    explore

    TRAVEL

    BERLIN GUIDE

  • Home Decor
  • Upcycling

DIY | Book print

Total
0
Shares
0
0
0
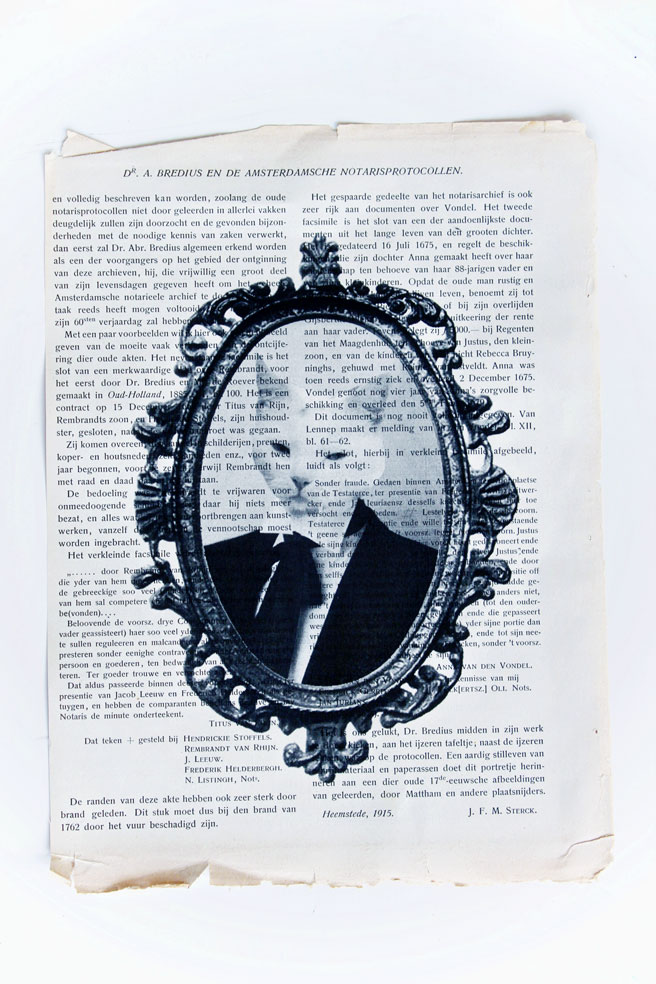
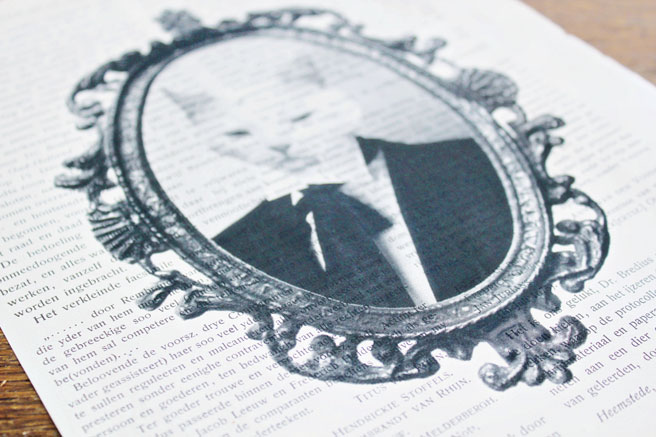
Here’s a quick and super easy tutorial for you: Printing your own design or image onto an old book page. 
I really enjoyed making this vintage looking artwork, and it is so fast to make. I used the design that I made for my leather printing tutorial and I think it really gives it that cute vintage feel.
 
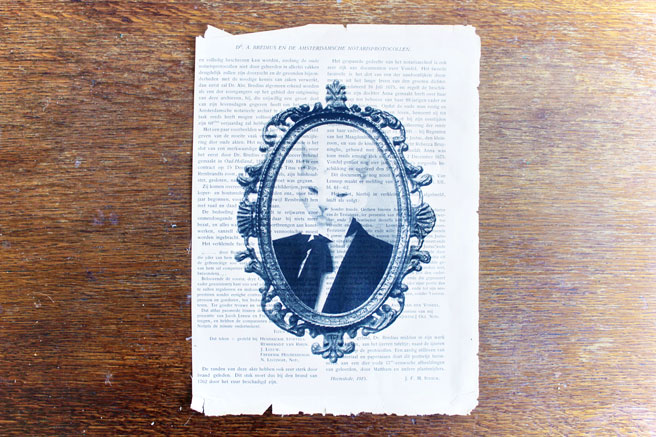
I can’t wait to try out more designs on old paper and frame them!
DIY:
 
Design your own image, or simply take an old picture and make it print ready.
 
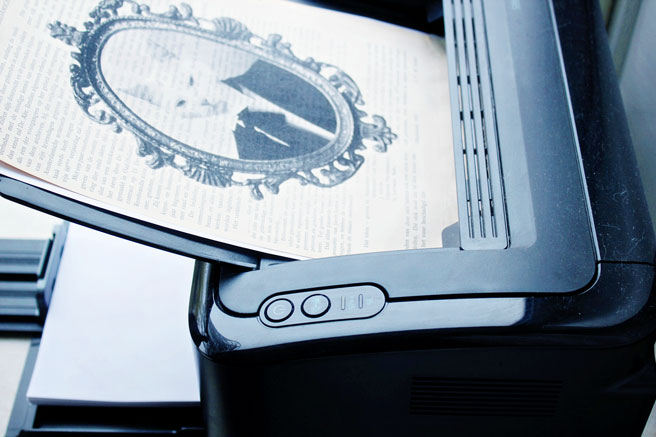
1. If your Paper has torn edges like mine or is to small to fit properly in the printer, use painters tape to tape it to a standard A4 size paper. Make sure that the painters tape is not very sticky.
2. Place the piece of paper in the printer and print the image onto the paper.
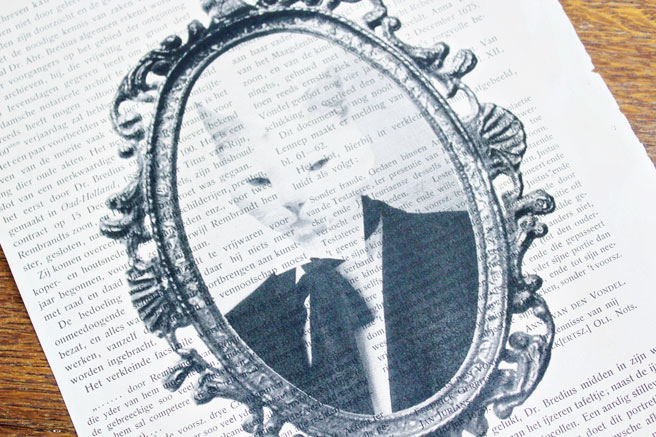
 
All done!
 

Total
0
Shares
Share 0
Tweet 0
Pin it 0
Previous Article
  • Uncategorised

And the winner is….

View Post
Next Article
  • Home Decor

DIY | Wooden Door Hanger

View Post

Sign Up for the LRS Newsletter

Be the first to receive lots of crafty news!

Get ready for more creative articles:
UPCYCLING DIY Old T-Shirt Hair Scrunchie
View Post
  • DIYit/BUYit
  • Sewing & Style
  • Upcycling

UPCYCLING DIY | Old T-Shirt Hair Scrunchie

DIY | Card Holder Phone Case
View Post
  • Sewing & Style
  • Tech DIY
  • Upcycling

DIY | Card Holder Phone Case

SMALL STUDIO APARTMENT | 10 Tips, Tricks and Ideas to Maximize Your Space
View Post
  • Home Decor

SMALL STUDIO APARTMENT | 10 Tips, Tricks and Ideas to Maximize Your Space

HANGING PLANTER DIY | From Sifter to Planter
View Post
  • Home Decor
  • Upcycling

HANGING PLANTER DIY | From Sifter to Planter

RESTYLE DIY | Custom Sofa Fabric Design
View Post
  • Home Decor
  • Rijksstudio
  • Sponsored
  • Upcycling

RESTYLE DIY | Custom Sofa Fabric Design

DIY | Candle Wax Table Lamp
View Post
  • Home Decor
  • Upcycling

DIY | Candle Wax Table Lamp

ART DIY | Handmade Collage Greeting Card
View Post
  • DIYit/BUYit
  • Home Decor
  • Tech DIY

ART DIY | Handmade Collage Greeting Card

DIY | How to Restyle a Plain Cupboard
View Post
  • Home Decor
  • Upcycling

DIY | How to Restyle a Plain Dresser

17 comments
  1. Yelle says:
    17th November 2012 at 7:19 pm

    This is so great! It really would be a great holiday gift for anyone!

    Reply
    1. Lana Red says:
      21st November 2012 at 12:39 pm

      Thank you! And your right, you can adjust it to everyones taste!

      Reply
  2. Julia González Martín says:
    17th November 2012 at 7:45 pm

    i love your blog!! it´s soo cute ^^
    kisses from
    http://www.meltedchocolatenotebook.blogspot.com.es

    Reply
    1. Lana Red says:
      21st November 2012 at 12:39 pm

      Thank you!

      Reply
  3. Maranda says:
    22nd November 2012 at 11:05 pm

    I love it! I will definitely have to make this. c:

    Reply
    1. Lana Red says:
      25th November 2012 at 10:08 am

      Thank you! And please let me know how yours turned out!

      Reply
  4. Marisa says:
    15th December 2012 at 12:47 am

    Love that print and thanks for the tutorial. I am trying to print an image but it starts printing from top of page and I want it to print in the center of the paper. How do I do that?

    Reply
    1. Jennifer Greene says:
      18th December 2012 at 4:35 am

      Open it up in paint and go to print preview. Top LEFT corner it should have a print set up button. There are a few options in there for centering and sizing appropriately.

      I accidentally said right the first time sorry!

      Reply
    2. Lana Red says:
      22nd December 2012 at 10:42 am

      Thank you for the explanation Jennifer!

      And I hope your print turned out great Marisa!

      x

      Reply
  5. Jennifer says:
    18th December 2012 at 4:11 am

    For anyone looking to try this, just google image search the word “illustration” and it comes up with lots of funky cool black and white images similar to this one.

    Reply
  6. Anonymous says:
    8th March 2013 at 4:02 pm

    Love your blog!!

    Reply
    1. Lana Red says:
      13th March 2013 at 8:13 pm

      Thank you so much!

      Reply
  7. instantpublisher says:
    19th March 2013 at 12:30 pm

    That is so very Cool!
    I’m very excited to see a copy!
    I’m sure the end product is going to be very special, even before I get a chance to see it.
    Book printing

    Reply
  8. Larissa, says:
    13th April 2013 at 12:30 am

    Hi! Do you mind share with us the image of the cat? I really really love it.

    Reply
    1. Lana Red says:
      15th April 2013 at 1:04 pm

      Hi Larissa, I am sorry but I am going to keep the image to myself:) You can however make one yourself? I used photoshop but will also work.

      Just google victorian picture frame, and erase the inside in paint or photoshop. Then take a picture of a cut and place it in the frame.

      I hope this helps!
      x

      Reply
    2. Larissa, says:
      18th April 2013 at 1:16 am

      Thank you! I’ll make mine.

      :)

      Reply
  9. Pingback: DIY: Buchseiten Prints « The Private Readers

Leave a Reply Cancel reply

Your email address will not be published. Required fields are marked *

ABOUTLRS
THE LRS NEWSLETTER
  • But you don't look autistic at alll
    PERSONAL | Grief and other things
  • JEWELRY DIY | Gold Leaf Teardrop Earrings
    JEWELRY DIY | Gold Leaf Teardrop Earrings
  • UPCYCLING DIY Old T-Shirt Hair Scrunchie
    UPCYCLING DIY | Old T-Shirt Hair Scrunchie
One of my fav projects! The Origami Swan Brooch, made out of copperplate. It’s such a simple, yet unique item. Check out the blogs archive for the full tutorial!
BOOKSWAP! (For now, this is for all Dutch based friends)
The Dutch COVID lockdown has been extended for another 3 weeks. I am lucky to still have steady work as a freelancer and I know that it is hard on so many people, but let's all stay safe and take this serious.
NEW ILLUSTRATION • This time it's a personal one: A drawing of my sister Kelly, who passed away last year.
NEW ILLUSTRATION! • This time it is Christmas themed. Hurray!
It's official: we, the cheese loving Dutchies are in Covid lockdown.

Sign Up for the LRS Newsletter

Let's be friends!

  • Privacy Policy

Input your search keywords and press Enter.