LRS
  • START HERE
  • DIY
    • SEWING & STYLE
    • HOME DECOR
    • JEWELRY
    • TECH DIY
    • ANIMAL
    • ROUNDUPS
    • CHRISTMAS CRAFTS
  • FASHION
    • NAIL DESIGN
    • HAIR
    • MAKE-UP
    • OUTFITS
    • FASHION INSPIRATION
    • TIPS & ADVICE
  • RECIPES
    • BREAKFAST
    • DESSERTS
    • TREATS
    • SAVORY
  • TRAVEL
    • TRAVEL
    • BERLIN GUIDE
  • INSPIRED
    • ART
    • BLOGGING
    • PERSONAL
  • ABOUT
    • CONTACT
  • SHOP
  • START HERE
  • ABOUT
  • CONTACT
  • SHOP
L A N A R E D S T U D I O
  • CRAFTS

    SEWING & STYLE

    HOME DECOR

    JEWELRY

    ROUNDUPS

    TECH DIY

    CHRISTMAS CRAFTS

    ANIMAL

    UPCYCLING

    HOME DECOR

    UPCYCLING DIY | Decoupage Lampshade, with paper napkins

    TECH DIY

    DIY | Card Holder Phone Case

    JEWELRY

    JEWELRY DIY | Polymer Clay Flower Earrings

  • FASHION

    OUTFITS

    HAIR

    MAKE UP

    NAIL DESIGN

    FASHION INSPIRATION

    TIPS & ADVICE

    HAIR STYLES

    HAIR DIY VIDEO | Braided Scarf Hairstyle

    NAIL DESIGN

    NAIL DIY | It's a Glittery Sharpie Christmas

    Outfits

    OUTFIT | Autumn, Me & My Tripod

  • RECIPES

    DESSERTS

    SAVORY

    TREATS

    BREAKFAST

    BREAKFAST

    RECIPE | Sugar Free - Banana Bread

    TREATS

    RECIPE | Courgette Chips

    SAVORY

    RECIPE | Sweet Potato & Goat's Cheese Tart

  • INSPIRED

    ART

    BLOGGING

    PERSONAL

    BLOGGING

    HOW TO | 10 PRACTICAL Tips Every Blogger Should Learn

    PERSONAL

    PERSONAL | Grief and other things

    ART

    DIY | Double Exposure Photography

  • TRAVEL

    Berlin

    TRAVEL | BERLIN GUIDE

    Travel

    LIVING ABROAD | How to Make Your Temporary Home Feel Like Home

    explore

    TRAVEL

    BERLIN GUIDE

  • Sewing & Style
  • Upcycling

DIY | Fabric Transfer

Total
5
Shares
0
0
5
 
I recently posted a couple of old pictures that my dad took and I really wanted to integrate them into a new project. So I used one picture to try out a fabric transfer project using Gel medium. 
 
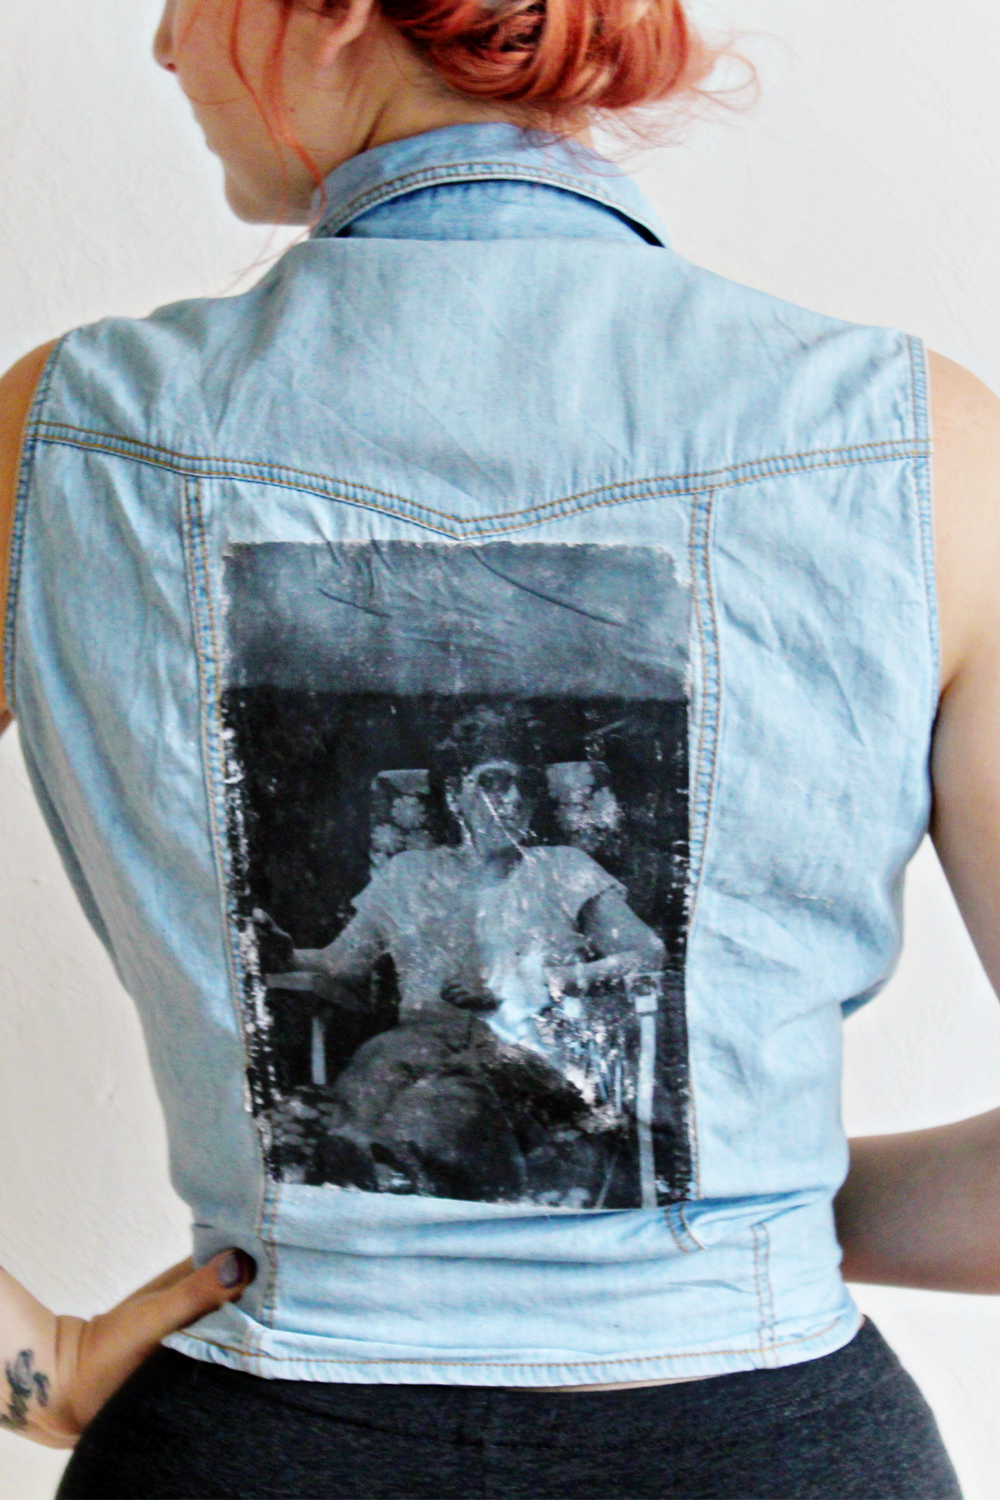
The picture is of my mom and I wanted to capture the vintage feel of the picture, so I decided to transfer it to the back of a denim shirt.
 
DIY:
Supplies: Shirt/piece of fabric, laser printed image, Gel Medium
 
1. Print your favorite image with a laser printer.
2. Apply a thick amount of Gel Medium on the right side of the paper (so you cover the image up with the gel).
3. Place the paper face down onto the fabric. And let it dry for a couple of hours or overnight.
4. Take some water and dab it onto the paper. Use your fingers to rub the paper of. This may take a while and there will be several layers of paper to remove. Make sure you don’t rub to hard, or you will scratch the image! 
 
The image transfer probably won’t come out as perfect as the original image, but I think that it suits the style and makes it look more unique.
 
All done!
 
DIY | Fabric Transfer
 
Total
5
Shares
Share 0
Tweet 0
Pin it 5
Previous Article
  • Home Decor
  • Sewing & Style

DIY | Tea Towel

View Post
Next Article
  • Uncategorised

And the winner is….

View Post

Sign Up for the LRS Newsletter

Be the first to receive lots of crafty news!

22 comments
  1. Amy K says:
    12th November 2012 at 6:34 pm

    I love this!!!! You have great DIY

    Much Love
    amyklundt.blogspot.com

    Reply
    1. Lana Red says:
      21st November 2012 at 12:36 pm

      Thank you!xx

      Reply
  2. Anonymous says:
    14th November 2012 at 10:37 am

    I thought about what happens when you wash it…!?

    Reply
    1. Lana Red says:
      21st November 2012 at 12:35 pm

      Hi, Thank you for reminding me! I totally forgot to mention in the post that you can wash it, bit it’s handwash only! So just gently wash the fabric without to much rubbing.

      Reply
  3. Anonymous says:
    24th November 2012 at 10:29 pm

    hello,great diy.what kind gel medium do you use?

    Reply
    1. Lana Red says:
      25th November 2012 at 10:16 am

      Hi, I used the gel medium from liquitex:

      http://www.liquitex.com/GelMediums/

      xx

      Reply
  4. Anonymous says:
    26th November 2012 at 5:48 pm

    I love this idea. Does it need to be a laser printed copy? I’m not sure if my printer is laser or inkjet (embarassing, I know.)

    Thanks for your help.

    LB

    Reply
    1. Lana Red says:
      30th November 2012 at 8:37 am

      Hi!

      Yes, it has to be an inkjet printed image. I don’t really know why, but the image won’t transfer completely when you use an inkjet printed image.

      xx

      Reply
  5. Mia Annie says:
    26th November 2012 at 8:56 pm

    I love this shirt :)

    Reply
    1. Lana Red says:
      30th November 2012 at 8:37 am

      Thank you!

      Reply
  6. brytknee says:
    28th November 2012 at 9:55 pm

    does it only work with black and white images?

    Reply
    1. Lana Red says:
      30th November 2012 at 8:38 am

      No it doesn’t! You can definitely use color images. It’s just that I only have a black & white laser printer at home, so most of my printer involved tutorials will be black and white ;)

      Reply
  7. Kate says:
    3rd December 2012 at 4:39 am

    Love this! very cool

    Reply
    1. Lana Red says:
      9th December 2012 at 9:31 am

      Thanx!

      Reply
  8. Alyssa Christine Landez says:
    23rd January 2013 at 11:52 pm

    I loved doing this in high school for art projects. Never thought about doing it on fabric. :) Great DIY. Can’t wait to do it.

    Reply
    1. Lana Red says:
      6th February 2013 at 11:44 am

      Thank you! And let me know how yours turned out!x

      Reply
  9. Camille Sauvaud says:
    30th May 2013 at 2:43 pm

    Hi, I am french and i love your shirt !
    I would like to apply your idea but I haven’t understood the step 2 and 3. Could you explain more clearly please.
    Thank you

    Reply
    1. Lana Red says:
      28th June 2013 at 3:04 pm

      Hi Camille!

      How great that your are trying the tutorial!

      Step 2 and 3 are really easy. Just apply a thick amount of the gel medium on the side of the paper where the image is on. Than place the paper with the image face down onto your fabric. And just let it dry for a couple of hours!

      Good luck!

      Reply
  10. Tracy says:
    6th January 2019 at 1:10 am

    Hi! I have so many ideas to use this technique on t shirts but I have to be able to machine wash them. Is there any way to seal the print so it is washable and permanent? Could I paint textile medium on top of the image to seal it and make it permanent? Thank you!

    Reply
    1. Lana Red says:
      8th January 2019 at 10:41 am

      Hi Tracy! When I did a few testruns for this project and machine washed them, the image came off almost entirely. Adding textile medium on top of the image might help, but I would advice to do a few tests before. Happy crafting! Lana x

      Reply
  11. Nell says:
    29th August 2024 at 12:00 am

    Will this transfer the white of the paper or just the ink that is printed onto the paper? Thanks!

    Reply
    1. Lana Red says:
      20th September 2024 at 10:28 am

      It will only transfer the ink that is printed (after rubbing the paper of, see step 4)

      Reply

Leave a Reply Cancel reply

Your email address will not be published. Required fields are marked *

THE LRS NEWSLETTER
  • JEWELRY DIY | Polymer Clay Flower Earrings
  • DIY Decoupage Lampshade
    UPCYCLING DIY | Decoupage Lampshade, with paper napkins
  • JEWELRY DIY | Beaded daisy flower for Necklaces, Earrings and Bracelets
    JEWELRY DIY | Beaded daisy flower for Necklaces, Earrings and Bracelets

Sign Up for the LRS Newsletter

Let's be friends!

  • Privacy Policy

Input your search keywords and press Enter.