LRS
  • START HERE
  • DIY
    • SEWING & STYLE
    • HOME DECOR
    • JEWELRY
    • TECH DIY
    • ANIMAL
    • ROUNDUPS
    • CHRISTMAS CRAFTS
  • FASHION
    • NAIL DESIGN
    • HAIR
    • MAKE-UP
    • OUTFITS
    • FASHION INSPIRATION
    • TIPS & ADVICE
  • RECIPES
    • BREAKFAST
    • DESSERTS
    • TREATS
    • SAVORY
  • TRAVEL
    • TRAVEL
    • BERLIN GUIDE
  • INSPIRED
    • ART
    • BLOGGING
    • PERSONAL
  • ABOUT
    • CONTACT
  • SHOP
  • START HERE
  • ABOUT
  • CONTACT
  • SHOP
L A N A R E D S T U D I O
  • CRAFTS

    SEWING & STYLE

    HOME DECOR

    JEWELRY

    ROUNDUPS

    TECH DIY

    CHRISTMAS CRAFTS

    ANIMAL

    UPCYCLING

    HOME DECOR

    SMALL STUDIO APARTMENT | 10 Tips, Tricks and Ideas to Maximize Your Space

    TECH DIY

    DIY | Card Holder Phone Case

    JEWELRY

    JEWELRY DIY | Gold Leaf Teardrop Earrings

  • FASHION

    OUTFITS

    HAIR

    MAKE UP

    NAIL DESIGN

    FASHION INSPIRATION

    TIPS & ADVICE

    HAIR STYLES

    HAIR DIY VIDEO | Braided Scarf Hairstyle

    NAIL DESIGN

    NAIL DIY | It's a Glittery Sharpie Christmas

    Outfits

    OUTFIT | Autumn, Me & My Tripod

  • RECIPES

    DESSERTS

    SAVORY

    TREATS

    BREAKFAST

    BREAKFAST

    RECIPE | Sugar Free - Banana Bread

    TREATS

    RECIPE | Courgette Chips

    SAVORY

    RECIPE | Sweet Potato & Goat's Cheese Tart

  • INSPIRED

    ART

    BLOGGING

    PERSONAL

    BLOGGING

    HOW TO | 10 PRACTICAL Tips Every Blogger Should Learn

    PERSONAL

    PERSONAL | Grief and other things

    ART

    DIY | Double Exposure Photography

  • TRAVEL

    Berlin

    TRAVEL | BERLIN GUIDE

    Travel

    LIVING ABROAD | How to Make Your Temporary Home Feel Like Home

    explore

    TRAVEL

    BERLIN GUIDE

  • Home Decor
  • Upcycling

DIY | Lampshade

Total
140
Shares
1
0
139
DIY | Lampshade
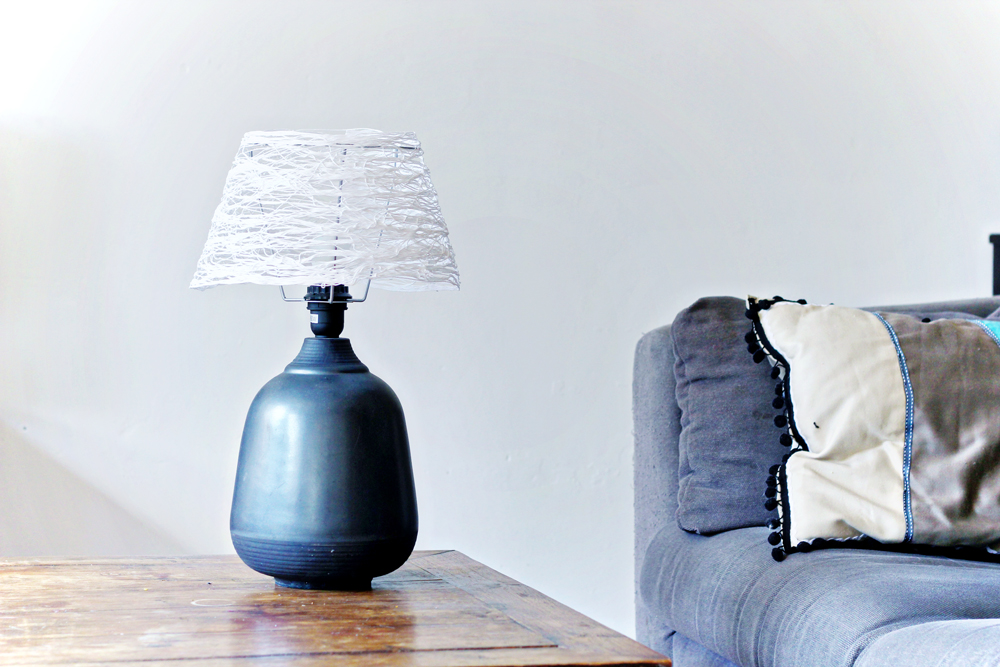
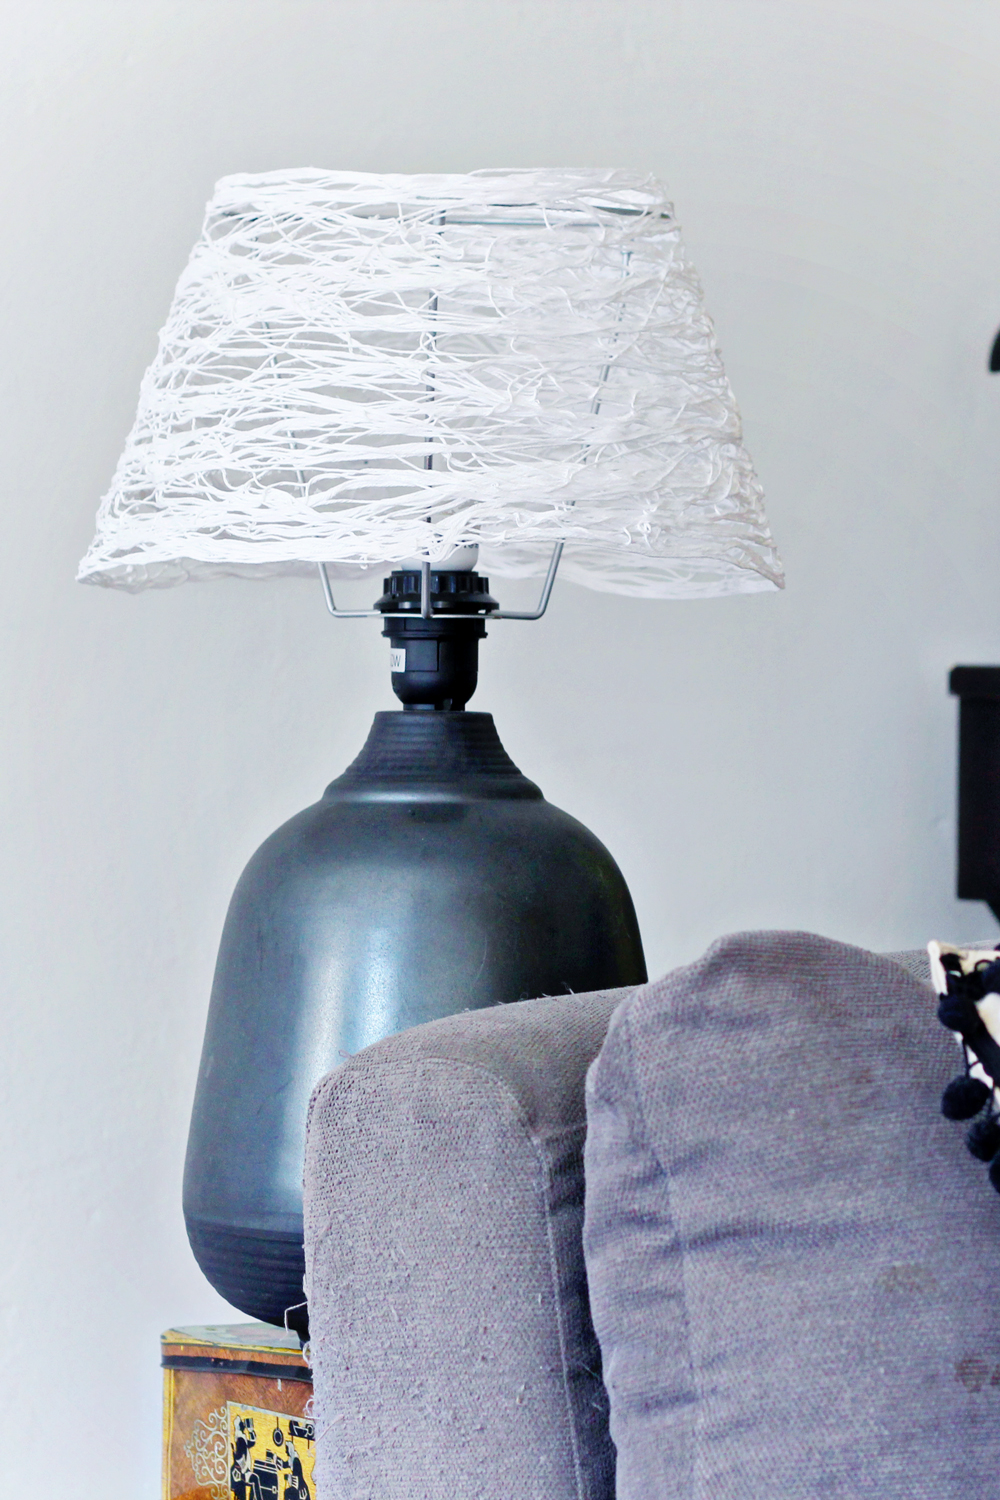
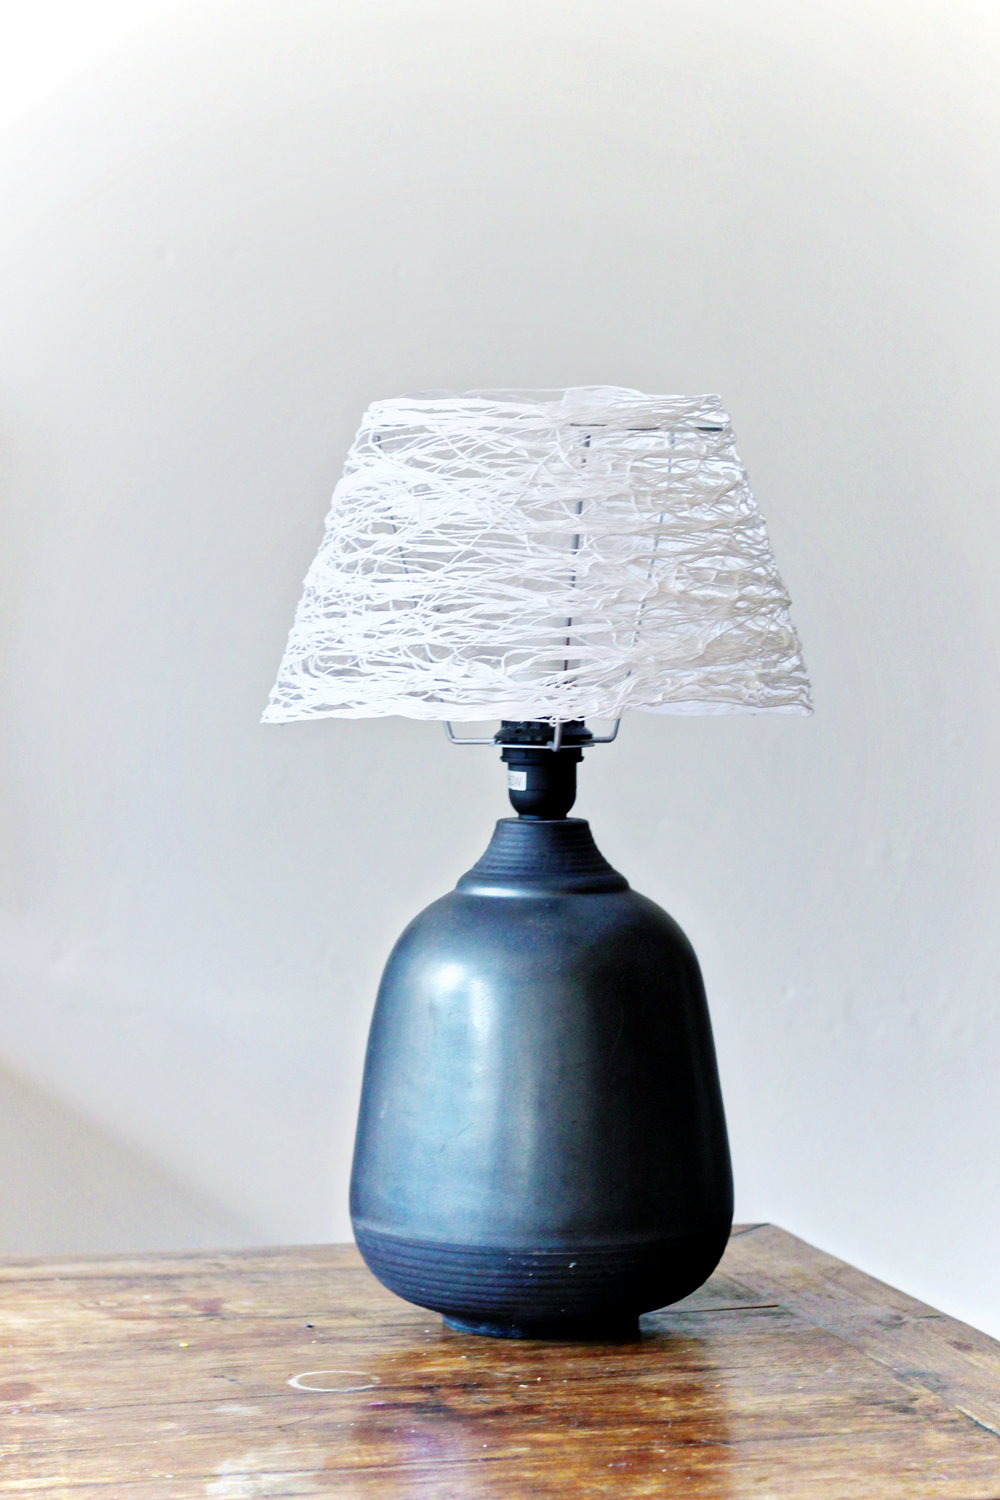
Here is an easy tutorial for a yarn lampshade. I was inspired by all those lamps made out of yarn that people are making these days, using a balloon. So I thought why not make a regular shaped lampshade but with the yarn technique to make a look more unique.
 
I bought this lamp at a thrift store, but it’s originally from Ikea. The lamp itself is pretty big and heavy, so I thought that this yarn idea would make the lamp a bit more modern.
 
Here’s how I did it:
DIY | Lampshade
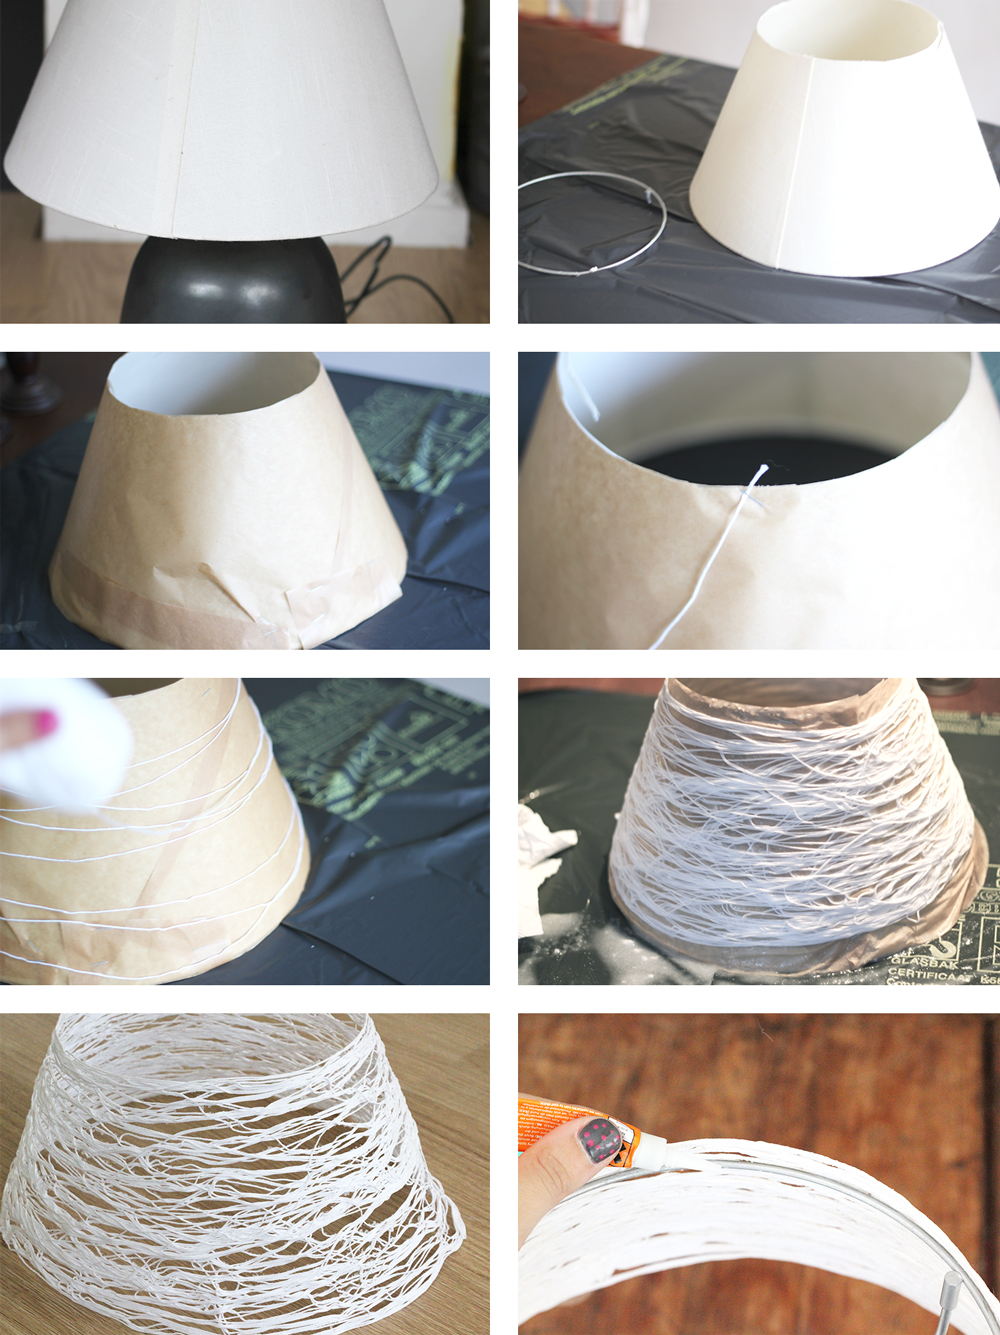
1. Get your supplies:
– On old lampshade, in the shape you want your creation to be.
– Yarn
– Bakingpaper
– Wallpaper glue
– scissors
– tape or a stapler
– superglue
2. Remove the top of your lampshade, or any part that holds it to the foot of the lamp(you will be needing this to attach your homemade lampshade back to the lamp)
3. Cover the lampshade with the baking paper. This is to make sure that the yarn won’t stick to the lampshade. You can try to use tape to attach the paper to the lampshade, but a stapler worked better for me.
4. Staple or tape the first piece of the yarn to the baking paper.
5. Start whirling the yarn around the lampshade.
6. Mix the wallpaper glue with water and gently dab the yarn with the glue. Make sure that every piece is covered in glue.
7. Let the glue dry. This can take a while, it took my lampshade three days to completely dry. After it completely dried, gently remove the hard yarn from the baking paper.
8. Get your superglue and glue the basis back to the new lampshade, so you can reattach it to the lamp.
 
All done!
DIY | Lampshade DIY | Lampshade

Total
140
Shares
Share 1
Tweet 0
Pin it 139
Previous Article
  • Desserts
  • Recipes

RECIPE | Strawberry Cream Cake

View Post
Next Article
  • Desserts
  • Recipes

RECIPE | Blackberry Yoghurt Icecream

View Post

Sign Up for the LRS Newsletter

Be the first to receive lots of crafty news!

Get ready for more creative articles:
UPCYCLING DIY Old T-Shirt Hair Scrunchie
View Post
  • DIYit/BUYit
  • Sewing & Style
  • Upcycling

UPCYCLING DIY | Old T-Shirt Hair Scrunchie

DIY | Card Holder Phone Case
View Post
  • Sewing & Style
  • Tech DIY
  • Upcycling

DIY | Card Holder Phone Case

SMALL STUDIO APARTMENT | 10 Tips, Tricks and Ideas to Maximize Your Space
View Post
  • Home Decor

SMALL STUDIO APARTMENT | 10 Tips, Tricks and Ideas to Maximize Your Space

HANGING PLANTER DIY | From Sifter to Planter
View Post
  • Home Decor
  • Upcycling

HANGING PLANTER DIY | From Sifter to Planter

RESTYLE DIY | Custom Sofa Fabric Design
View Post
  • Home Decor
  • Rijksstudio
  • Sponsored
  • Upcycling

RESTYLE DIY | Custom Sofa Fabric Design

DIY | Candle Wax Table Lamp
View Post
  • Home Decor
  • Upcycling

DIY | Candle Wax Table Lamp

ART DIY | Handmade Collage Greeting Card
View Post
  • DIYit/BUYit
  • Home Decor
  • Tech DIY

ART DIY | Handmade Collage Greeting Card

DIY | How to Restyle a Plain Cupboard
View Post
  • Home Decor
  • Upcycling

DIY | How to Restyle a Plain Dresser

10 comments
  1. Anonymous says:
    16th August 2012 at 10:13 pm

    So when/how do you remove the original lampshade and paper from the yarn?

    Reply
    1. Anonymous says:
      16th August 2012 at 10:36 pm

      After the glue/yarn dries you want to remove it. If you remove it sooner than that the yarn would just fall apart.

      Reply
    2. Lana Red says:
      17th August 2012 at 7:45 am

      Hi!

      I’m sorry, I did write about letting it dry in the tutorial, but forgot to mention when to remove the yarn from the baking paper. I adjusted the tutorial and hope that everything worked out well!

      If you have any questions, please feel free to ask!

      xoxo Lana

      Reply
    3. Anonymous says:
      18th August 2012 at 5:15 am

      Thanks! I just wanted to be sure. I have a lamp my grandmother made out of an interesting bottle (she’s the craftiest of us all) and I this think this shade will go perfectly. :-)

      Reply
  2. Lexy @ The Proper Pinwheel says:
    24th August 2012 at 9:45 pm

    Ok – how perfect and awesome is this?!? It’s just stunning. Shared in my finds today. Thank you for the inspiration!

    http://theproperpinwheel.com/2012/08/fresh-find-friday-50/

    Reply
    1. Lana Red says:
      2nd September 2012 at 9:45 am

      Thank you so much for sharing it! xx

      Reply
  3. Maria Luisa Artesanatos says:
    25th August 2012 at 4:08 am

    Super!! I have one like this and i will do this. Thanks!!

    Reply
    1. Lana Red says:
      2nd September 2012 at 9:45 am

      Hi Maria, thank you for your comment! And good luck with making one. Let me know how it turns out!

      Reply
  4. carmen says:
    25th August 2012 at 7:38 pm

    There are many lampshade-tutorials and this is a really beautiful one! But I always ask myself – where do you get those old lamps from? ;) I didn’t found any affordable around…

    Reply
    1. Lana Red says:
      2nd September 2012 at 9:48 am

      Hi Carmen, I was so inspired by your comment and the question about where to buy old lamps, that I wrote a new post about Low Budget and Vintage shopping. It will be on my blog later this afternoon (Dutch time).
      Thank you so much for your comment!
      xx Lana

      Reply

Leave a Reply Cancel reply

Your email address will not be published. Required fields are marked *

ABOUTLRS
THE LRS NEWSLETTER
  • But you don't look autistic at alll
    PERSONAL | Grief and other things
  • JEWELRY DIY | Gold Leaf Teardrop Earrings
    JEWELRY DIY | Gold Leaf Teardrop Earrings
  • UPCYCLING DIY Old T-Shirt Hair Scrunchie
    UPCYCLING DIY | Old T-Shirt Hair Scrunchie
No, this is not a regular print, it's a puzzle that I framed!
Since 2 articles about my autism diagnosis came out, I gained new followers here on Instagram, welcome new friends!
I am in today's newspaper!! I talk about my autism diagnosis and why there should be more awareness for autism in women.
I wrote about it in my Instastories, so here it goes: I am having a bad month!
NEW ILLUSTRATION!
I just finished being interviewd for

Sign Up for the LRS Newsletter

Let's be friends!

  • Privacy Policy

Input your search keywords and press Enter.