LRS
  • START HERE
  • DIY
    • SEWING & STYLE
    • HOME DECOR
    • JEWELRY
    • TECH DIY
    • ANIMAL
    • ROUNDUPS
    • CHRISTMAS CRAFTS
  • FASHION
    • NAIL DESIGN
    • HAIR
    • MAKE-UP
    • OUTFITS
    • FASHION INSPIRATION
    • TIPS & ADVICE
  • RECIPES
    • BREAKFAST
    • DESSERTS
    • TREATS
    • SAVORY
  • TRAVEL
    • TRAVEL
    • BERLIN GUIDE
  • INSPIRED
    • ART
    • BLOGGING
    • PERSONAL
  • ABOUT
    • CONTACT
  • SHOP
  • START HERE
  • ABOUT
  • CONTACT
  • SHOP
L A N A R E D S T U D I O
  • CRAFTS

    SEWING & STYLE

    HOME DECOR

    JEWELRY

    ROUNDUPS

    TECH DIY

    CHRISTMAS CRAFTS

    ANIMAL

    UPCYCLING

    HOME DECOR

    SMALL STUDIO APARTMENT | 10 Tips, Tricks and Ideas to Maximize Your Space

    TECH DIY

    DIY | Card Holder Phone Case

    JEWELRY

    JEWELRY DIY | Gold Leaf Teardrop Earrings

  • FASHION

    OUTFITS

    HAIR

    MAKE UP

    NAIL DESIGN

    FASHION INSPIRATION

    TIPS & ADVICE

    HAIR STYLES

    HAIR DIY VIDEO | Braided Scarf Hairstyle

    NAIL DESIGN

    NAIL DIY | It's a Glittery Sharpie Christmas

    Outfits

    OUTFIT | Autumn, Me & My Tripod

  • RECIPES

    DESSERTS

    SAVORY

    TREATS

    BREAKFAST

    BREAKFAST

    RECIPE | Sugar Free - Banana Bread

    TREATS

    RECIPE | Courgette Chips

    SAVORY

    RECIPE | Sweet Potato & Goat's Cheese Tart

  • INSPIRED

    ART

    BLOGGING

    PERSONAL

    BLOGGING

    HOW TO | 10 PRACTICAL Tips Every Blogger Should Learn

    PERSONAL

    PERSONAL | Grief and other things

    ART

    DIY | Double Exposure Photography

  • TRAVEL

    Berlin

    TRAVEL | BERLIN GUIDE

    Travel

    LIVING ABROAD | How to Make Your Temporary Home Feel Like Home

    explore

    TRAVEL

    BERLIN GUIDE

  • Jewelry

DIY | Shrink Plastic Rings

Total
30
Shares
0
0
30
DIY | Stackable Shrink Plastic Rings original
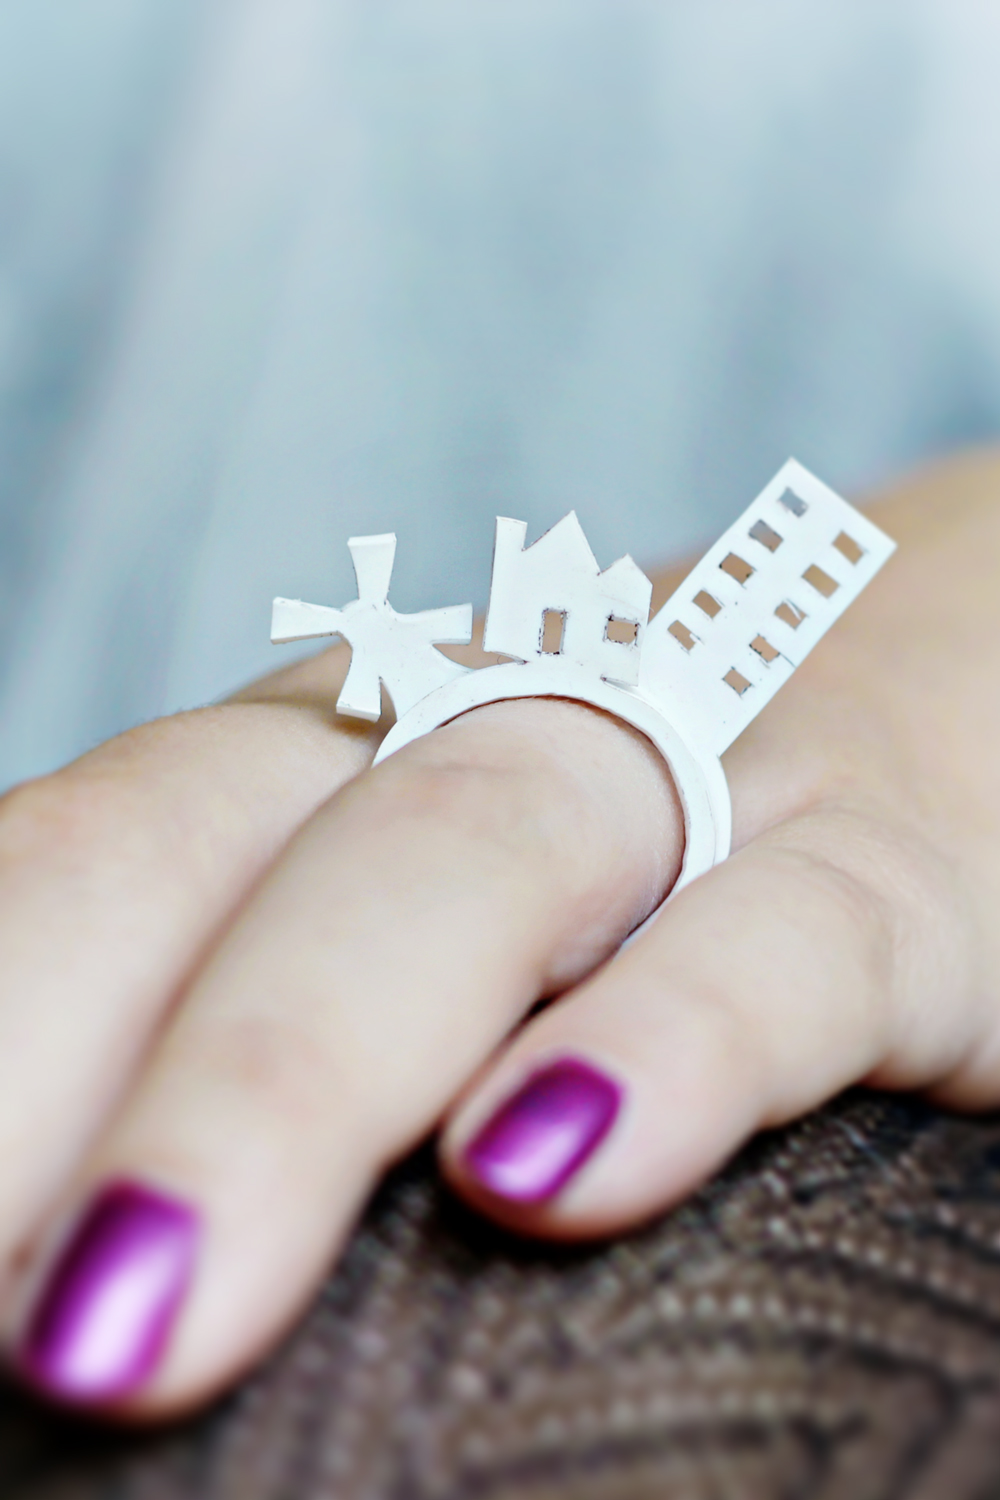
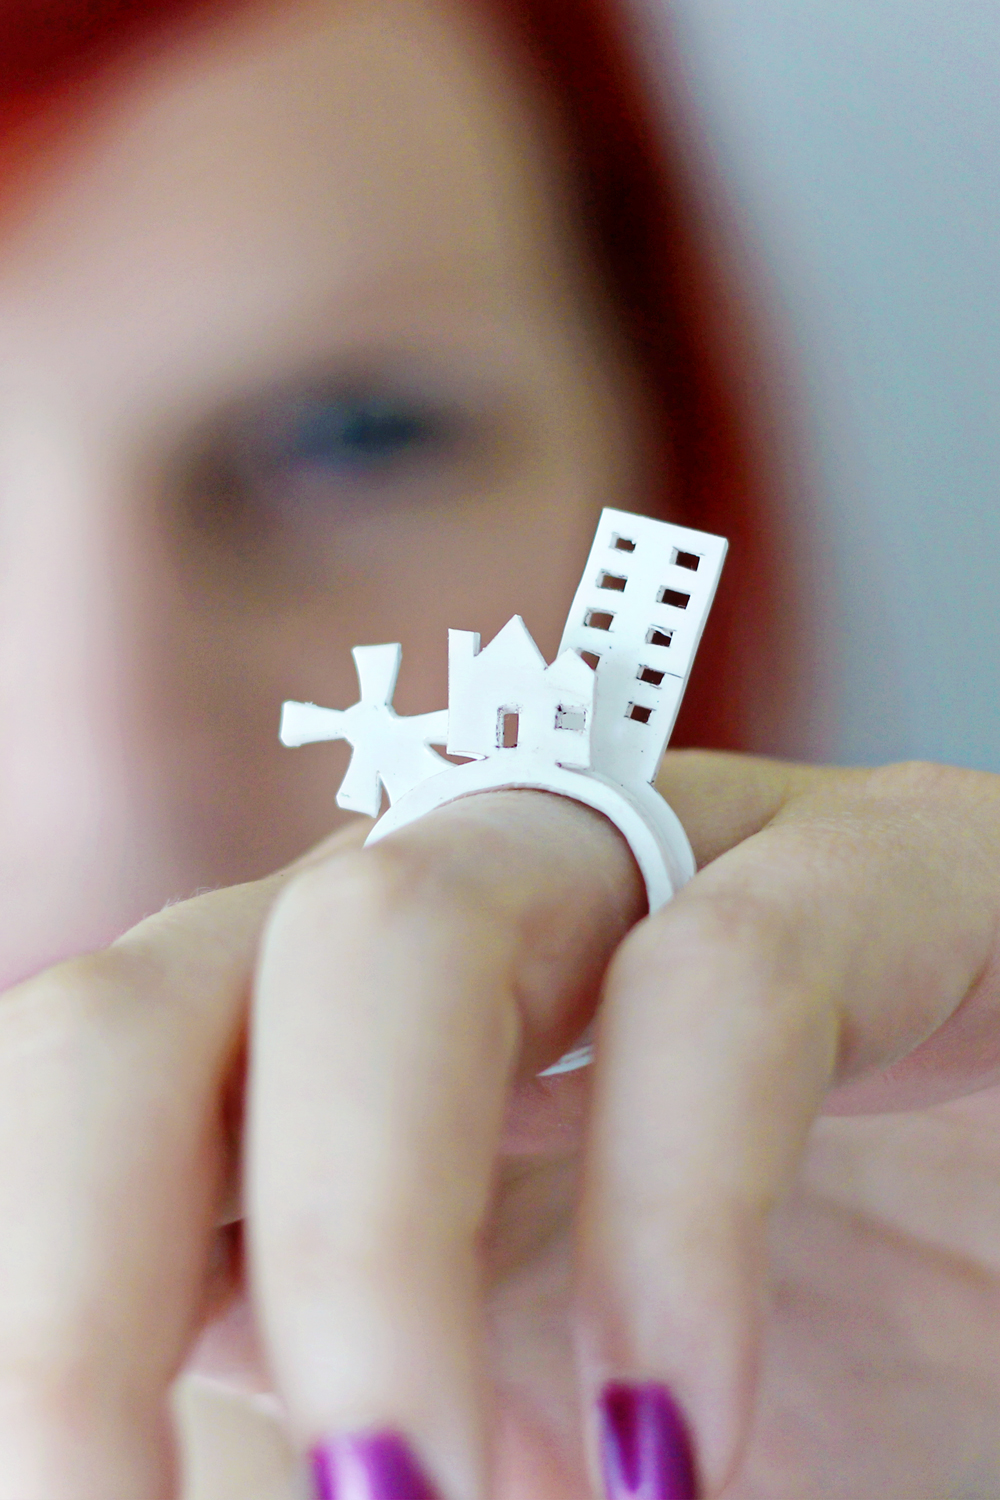
About a year ago I visited the Saatchi gallery in London. Besides having some incredible art pieces, they also have a very impressive store. They sell the best art books you can find, and a lot of accessories from some pretty amazing designers. That shop is where I stumbled upon these rings from Soop. I immediately fell in love with the concept of the ring and decided to try to make a version of my own.
I decided to make the rings out of shrinky dink plastic, because it’s affordable and I don’t really know any other way to make them :)
 
Here’s how:
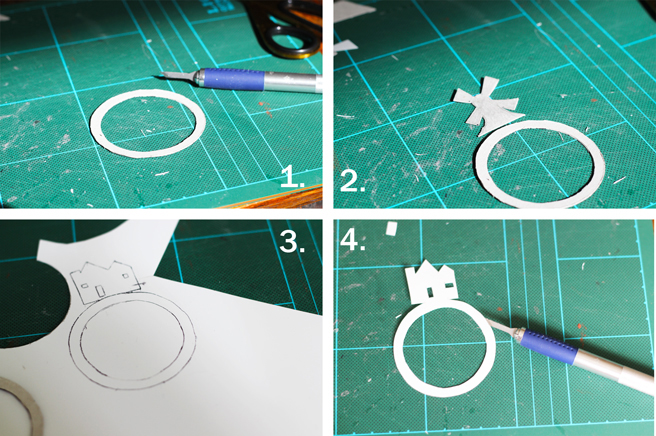
1. Print the free printable stencil. And cut out the ring out of cardboard like in image 1.
2. Design a shape that you want on top of your ring and cut that out of cardboard.
3. Trace the shapes onto the shrinky dink plastic.
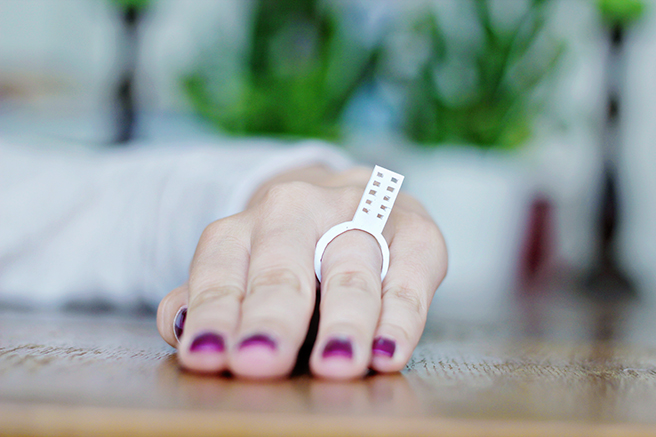
4. Cut the shapes out of the shrinky dink plastic. Place the shrinky dink in the oven and follow the instructions on the shrinky dink package.
 
** Extra tip: My rings sometimes rolled op too much in the oven and would stick together. To prevent this, I wrapped baking paper around the ring before I placed it in the oven, this will put a little weight on the ring and makes it curl less.
 
DIY | Stackable Shrink Plastic Rings original


Total
30
Shares
Share 0
Tweet 0
Pin it 30
Previous Article
  • Sewing & Style
  • Upcycling

DIY | Painted Heart Tights

View Post
Next Article
  • Jewelry

DIY | Printing Leather jewellery

View Post

Sign Up for the LRS Newsletter

Be the first to receive lots of crafty news!

Get ready for more creative articles:
JEWELRY DIY | Gold Leaf Teardrop Earrings
View Post
  • DIYit/BUYit
  • Jewelry
  • Video

JEWELRY DIY | Gold Leaf Teardrop Earrings

View Post
  • DIYit/BUYit
  • Jewelry

DIY | Minimal Clay Heart Earrings

DIY | Polymer Clay Initial Bracelet
View Post
  • DIYit/BUYit
  • Jewelry

DIY | Clay Initial Bracelet

View Post
  • DIYit/BUYit
  • Jewelry

DIY | Concrete and Gold Leaf Pendant

View Post
  • Jewelry

DIY | Embroidered Copper Bracelet

View Post
  • DIYit/BUYit
  • Jewelry

DIY | Copper Origami Brooch

View Post
  • Jewelry

ADVANCED DIY | Soldered Flower Necklace

View Post
  • Jewelry

DIY | Tassel Necklace

24 comments
  1. LicketyCut says:
    22nd September 2012 at 9:56 pm

    We’re so glad that we could help inspire you.

    You’ve done a great job with such simple materials :)

    LicketyCut

    Reply
    1. Lana Red says:
      26th September 2012 at 6:23 pm

      Hi, and thank you so much for commenting! I was very inspired by your work and I am very glad that you liked it!

      Reply
  2. Tina Pippo says:
    22nd September 2012 at 10:11 pm

    I didn’t really get how you made the ring with plastic but, oh! well! I don’t mind! It’s so beautiful!!
    Have a great Sunday!!
    Kisses from Greece!!

    Reply
    1. Lana Red says:
      26th September 2012 at 6:22 pm

      Thank you! And if you have any questions about this tutorial, please feel free to ask!

      Reply
  3. AD+SH DIY Fashion Blog says:
    23rd September 2012 at 11:09 pm

    Such a cute idea, you can build a mini city.
    Imagine buidling NY or Sydney or Paris across your fingers!!
    xx Tanya
    http://aciddreamsandsugarhighs.blogspot.com.au/

    Reply
    1. Lana Red says:
      26th September 2012 at 6:21 pm

      That is a great idea! I actually went for the Dutch theme, with the windmill. But It would also be great to try to make the eifeltower!

      Reply
  4. Joan says:
    24th September 2012 at 9:02 am

    this is beautiful!
    great idea!!

    Reply
    1. Lana Red says:
      26th September 2012 at 6:20 pm

      Thanks!

      Reply
  5. Bruna says:
    3rd October 2012 at 1:19 pm

    Really Like your DIY!
    In love with those rings!
    But How do you keep them from kneading?

    Bruna – Brazil
    http://www.diversalia.com.br

    Reply
    1. Lana Red says:
      12th January 2013 at 2:39 pm

      Thank you!

      And about the kneading: I sometimes use a piece of paper that is suitable for ovens and fold it around the shrink plastic, like wrapping it up as you would wrap a present. The weight of the paper sometimes helps to prevent it from kneading.

      I hope this helps, good luck!

      Reply
  6. Jenonymous says:
    7th January 2013 at 11:44 pm

    FANTASTIC idea. Can you please let me know what size ring is shown here, so that I can size up/down accordingly?

    I want to do an NYC set!!

    Reply
    1. Lana Red says:
      12th January 2013 at 2:50 pm

      Hi, the ring size is size 18. Sorry I forgot to mention this in the post :)

      Reply
  7. Mary Anne Enriquez says:
    8th January 2013 at 3:42 pm

    Yes, I wonder how one can know what size the template will be in the finished ring size? The plastic shrinks…and there should be some sort of ratio as to what the final ring size will be. How did you work out the proper size for your finger?

    Reply
    1. Lana Red says:
      12th January 2013 at 2:54 pm

      Hi, I am sorry I forgot to mention to tell my ringsize in the post. It is 18. Shrink plastic can vary though, so you might need to try it a couple of times.

      And I actually worked it out by making one ring in a size that I knew would be to big. I measured the shrink plastic before and after I placed it in the oven. And then calculated the right size from the failed attempt.

      Reply
  8. zdrop says:
    11th January 2013 at 5:00 pm

    Cool! Love it! Well done Lana! Sharing! :)

    Reply
    1. Lana Red says:
      12th January 2013 at 2:54 pm

      Thank you!

      Reply
  9. Patti MS says:
    30th January 2013 at 7:46 pm

    Oooh it’s so cool ! I love it ! I want to do an India set !

    Reply
  10. Anonymous says:
    19th July 2013 at 10:46 pm

    These are SO cute, I’m going to have my daughter and her friends make some during her 12th bday party! I plan to do a trial and error to get sizes right but where are you for size 18? I wnat to find a conversion to see what that would be for USA ring sizes to have a good starting point. I plan to buy some colored shrinky dink plastic. There is even black!! THANKS!! Julie

    Reply
    1. Lana Red says:
      29th July 2013 at 8:33 am

      That sounds like such a fun party! And I love that you are going to use different colors!

      I looked the ring sizes up and one website says that a
      European ringsize: 18 is the same as a
      US size: 7,5

      I hope this helps! Have fun at the party!

      Reply
  11. Anonymous says:
    26th January 2014 at 3:05 am

    Are these very hard or flexible? I’ve never played with shrink plastic before. I wonder where I could buy them locally- maybe toy stores?

    Reply
    1. Lana Red says:
      29th January 2014 at 6:22 pm

      they are not flexible. They turn into about 3 mm thick plastic. And I can only help you with local places to buy in Holland, sorry. But here they also sell it in toy stores, but it’s a lot more expensive than buying it online (again, this is my experience with Dutch stores)

      Good luck!

      Reply
  12. Anonymous says:
    18th February 2014 at 7:40 pm

    Hi i was wondering how you cut these, every time i try the plastic breaks. My exacto knife doesn’t cut all the way through so i have to bend it to break it on the perforations and then the whole ring breaks…

    Reply
    1. Lana Red says:
      11th March 2014 at 11:25 am

      Hi! I am so sorry that it doesn’t work. Just a quick question: Do you cut it before you place it in the oven? because afterwards it’s to thick to cut.
      Shrink plastic usually isn’t to thick to cut, I even use scissors sometimes(do be car full with those because they might crack the plastic). But a knife is better and more precise. I am sorry I can’t help you more.. Good luck!

      Reply
  13. Vanessa T. says:
    19th March 2014 at 7:21 am

    Lovely idea! So unique :)

    http://cafecraftea.blogspot.com

    Reply

Leave a Reply Cancel reply

Your email address will not be published. Required fields are marked *

ABOUTLRS
THE LRS NEWSLETTER
  • But you don't look autistic at alll
    PERSONAL | Grief and other things
  • JEWELRY DIY | Gold Leaf Teardrop Earrings
    JEWELRY DIY | Gold Leaf Teardrop Earrings
  • UPCYCLING DIY Old T-Shirt Hair Scrunchie
    UPCYCLING DIY | Old T-Shirt Hair Scrunchie
No, this is not a regular print, it's a puzzle that I framed!
Since 2 articles about my autism diagnosis came out, I gained new followers here on Instagram, welcome new friends!
I am in today's newspaper!! I talk about my autism diagnosis and why there should be more awareness for autism in women.
I wrote about it in my Instastories, so here it goes: I am having a bad month!
NEW ILLUSTRATION!
I just finished being interviewd for

Sign Up for the LRS Newsletter

Let's be friends!

  • Privacy Policy

Input your search keywords and press Enter.