LRS
  • START HERE
  • DIY
    • SEWING & STYLE
    • HOME DECOR
    • JEWELRY
    • TECH DIY
    • ANIMAL
    • ROUNDUPS
    • CHRISTMAS CRAFTS
  • FASHION
    • NAIL DESIGN
    • HAIR
    • MAKE-UP
    • OUTFITS
    • FASHION INSPIRATION
    • TIPS & ADVICE
  • RECIPES
    • BREAKFAST
    • DESSERTS
    • TREATS
    • SAVORY
  • TRAVEL
    • TRAVEL
    • BERLIN GUIDE
  • INSPIRED
    • ART
    • BLOGGING
    • PERSONAL
  • ABOUT
    • CONTACT
  • SHOP
  • START HERE
  • ABOUT
  • CONTACT
  • SHOP
L A N A R E D S T U D I O
  • CRAFTS

    SEWING & STYLE

    HOME DECOR

    JEWELRY

    ROUNDUPS

    TECH DIY

    CHRISTMAS CRAFTS

    ANIMAL

    UPCYCLING

    HOME DECOR

    SMALL STUDIO APARTMENT | 10 Tips, Tricks and Ideas to Maximize Your Space

    TECH DIY

    DIY | Card Holder Phone Case

    JEWELRY

    JEWELRY DIY | Gold Leaf Teardrop Earrings

  • FASHION

    OUTFITS

    HAIR

    MAKE UP

    NAIL DESIGN

    FASHION INSPIRATION

    TIPS & ADVICE

    HAIR STYLES

    HAIR DIY VIDEO | Braided Scarf Hairstyle

    NAIL DESIGN

    NAIL DIY | It's a Glittery Sharpie Christmas

    Outfits

    OUTFIT | Autumn, Me & My Tripod

  • RECIPES

    DESSERTS

    SAVORY

    TREATS

    BREAKFAST

    BREAKFAST

    RECIPE | Sugar Free - Banana Bread

    TREATS

    RECIPE | Courgette Chips

    SAVORY

    RECIPE | Sweet Potato & Goat's Cheese Tart

  • INSPIRED

    ART

    BLOGGING

    PERSONAL

    BLOGGING

    HOW TO | 10 PRACTICAL Tips Every Blogger Should Learn

    PERSONAL

    PERSONAL | Grief and other things

    ART

    DIY | Double Exposure Photography

  • TRAVEL

    Berlin

    TRAVEL | BERLIN GUIDE

    Travel

    LIVING ABROAD | How to Make Your Temporary Home Feel Like Home

    explore

    TRAVEL

    BERLIN GUIDE

  • Rijksstudio
  • Sewing & Style
  • Sponsored
  • Upcycling

DIY | Shoe Transfer

Total
10
Shares
0
0
10
I always love it when I have discovered a new trick that involves restyling! 
 
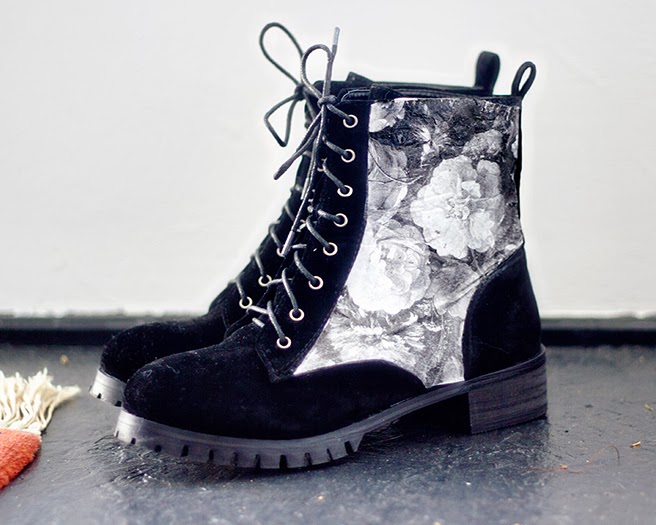
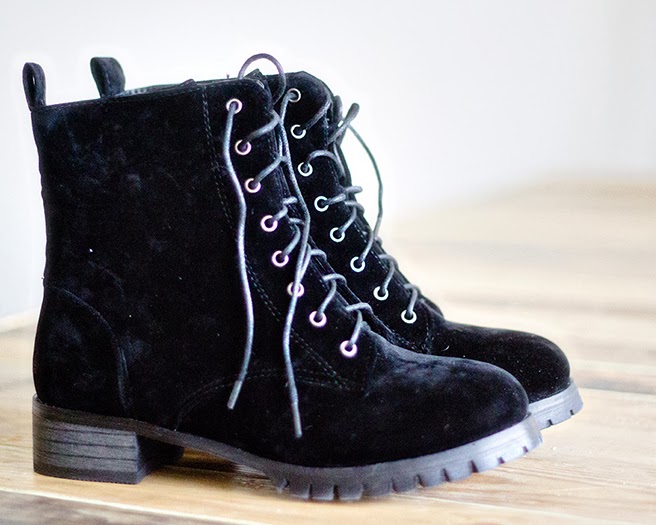
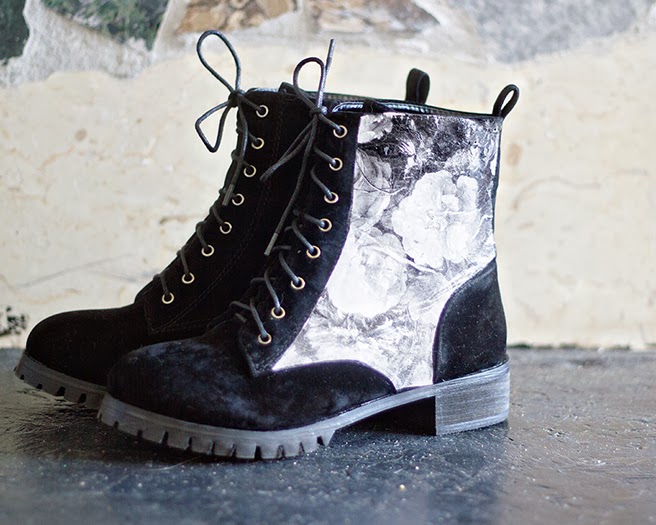
I ordered these cute boots from Chicwish with the idea that they would match with everything, and they do. But when they arrived, I realized that I have bought most of my shoes with the idea that they should match with my clothes and that just sounded a bit crazy to me, because why not just wear what you like?
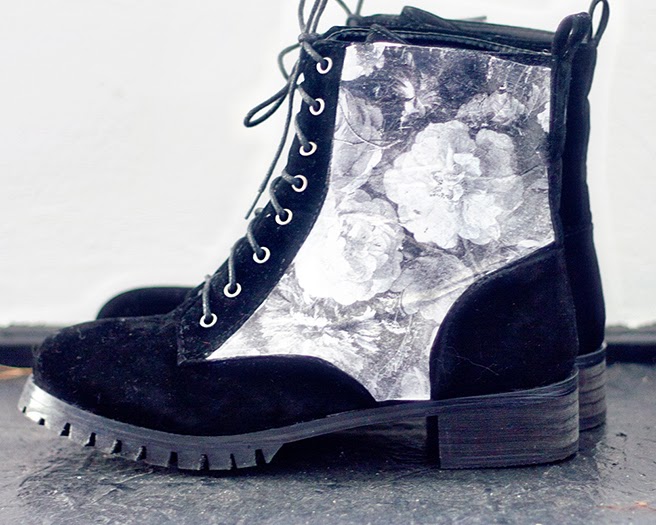
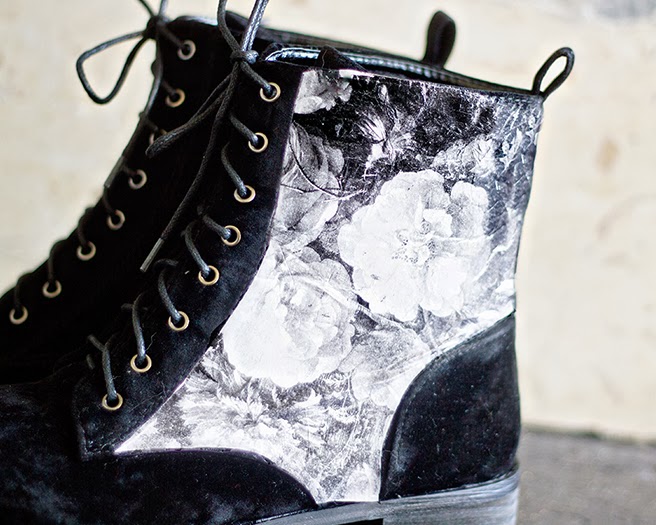
So instead of ignoring this and just wear them, I decided to give them an altered look and try out a new technique! Do you remember my Leather Printing Jewelry DIY? It involved using shirt transfer paper on suede. Well, this is sort of the same idea: I used T-shirt transfer paper to transfer an image onto the shoes. And I can’t believe it but it really worked!
 
It was pretty easy to do and didn’t cost much at all, I just can’t wait to try this on more of my shoes (or purses!)
First take a pare of shoes. I would not recommend shoes that have a glossy or smooth surface because the transfer paper will probably not attach very well. I used these (fake) suede boots which worked perfect!
Supplies:
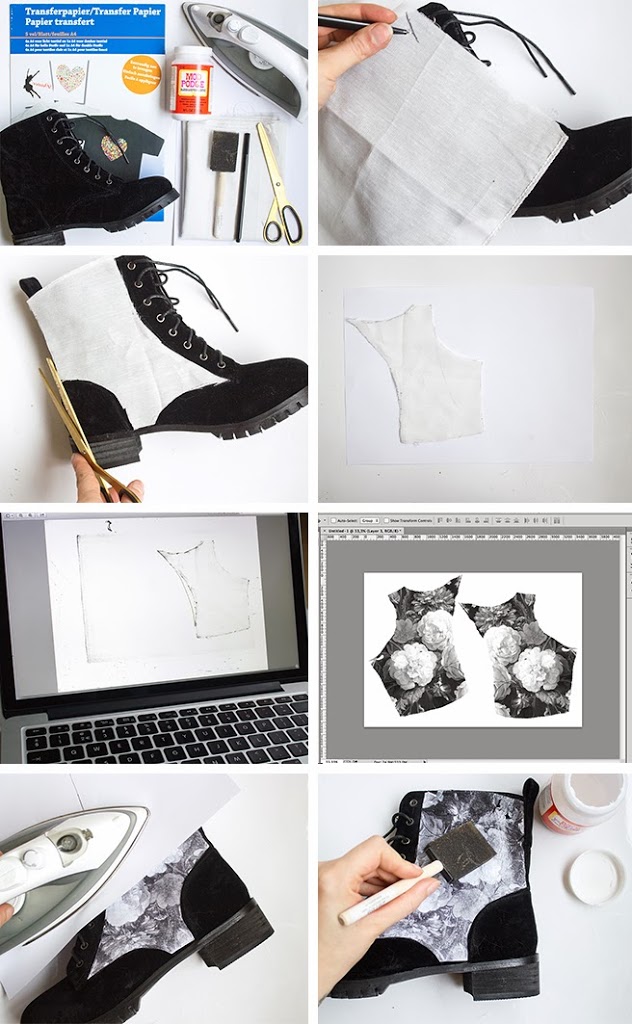
Shoes | Transfer Paper for darker fabrics | Printer | Iron | Piece of fabric | Scissors | Pen | Mod Podge | Brush
1. Place the piece of fabric on the shoe and trace the part that you want to cover with your pen.
2. Cut the shape.
3. Place the fabric on a piece of paper and scan the image. (you can use a scanner, but if you don’t have one you can use a free scan app on you phone.)
4. Open the scanned file in Photoshop. Make sure that it doesn’t change the size of the original image!
5. Trace the shape and fill it with a picture of your choosing. ( my image comes from the Rijksmuseum website)
6. Print the image on the transfer paper and transfer it to the shoes by following the instructions that come with the paper. Be careful not to keep the iron on there for too long!
7. Apply two layers of Mod Podge on the shoes.
 
All done!


Total
10
Shares
Share 0
Tweet 0
Pin it 10
Previous Article
  • Beauty
  • Make-up

MAKE-UP DIY | Vintage Inspired Daily Make-Up Routine

View Post
Next Article
  • Outfits
  • Travel

OUTFIT | Theatre Time Traveling

View Post

Sign Up for the LRS Newsletter

Be the first to receive lots of crafty news!

Get ready for more creative articles:
UPCYCLING DIY Old T-Shirt Hair Scrunchie
View Post
  • DIYit/BUYit
  • Sewing & Style
  • Upcycling

UPCYCLING DIY | Old T-Shirt Hair Scrunchie

DIY | Card Holder Phone Case
View Post
  • Sewing & Style
  • Tech DIY
  • Upcycling

DIY | Card Holder Phone Case

HANGING PLANTER DIY | From Sifter to Planter
View Post
  • Home Decor
  • Upcycling

HANGING PLANTER DIY | From Sifter to Planter

RESTYLE DIY | Custom Sofa Fabric Design
View Post
  • Home Decor
  • Rijksstudio
  • Sponsored
  • Upcycling

RESTYLE DIY | Custom Sofa Fabric Design

DIY | Candle Wax Table Lamp
View Post
  • Home Decor
  • Upcycling

DIY | Candle Wax Table Lamp

DIY | No-Sew Wire Headband
View Post
  • Sewing & Style
  • Video

DIY | No-Sew Wire Headband

DIY | How to Restyle a Plain Cupboard
View Post
  • Home Decor
  • Upcycling

DIY | How to Restyle a Plain Dresser

DIY | Color Block Print Cushion Cover
View Post
  • DIYit/BUYit
  • Home Decor
  • Sewing & Style

DIY | Color Block Print Cushion Cover

8 comments
  1. Viva La DIY says:
    24th February 2014 at 1:05 am

    Incredible, such a lovely floral print!
    ♡ Dulce

    Reply
    1. Lana Red says:
      11th March 2014 at 11:29 am

      Thanks!

      Reply
  2. Yolennie says:
    24th February 2014 at 4:22 pm

    Wow, this is absolutely brilliant! Thanks for sharing :)

    Yolennie
    http://www.lavenderfedora.blogspot.com

    Reply
    1. Lana Red says:
      11th March 2014 at 11:29 am

      Thank you!!x

      Reply
  3. Harmony says:
    9th March 2014 at 5:11 pm

    I love this idea!
    I live in Vancouver, BC – do you know how “rain-worthy” they are?

    Reply
    1. Lana Red says:
      11th March 2014 at 11:31 am

      I am not sure yet, because I haven’t worn them in the rain yet. But I made these :http://lanared.blogspot.nl/2012/10/restyling-boots-diy.html a while ago and I used the same mod podge on them and they survived the rain. So I am hoping that these will be rain-worthy too! xx

      Reply
  4. Arielle says:
    5th March 2015 at 7:13 pm

    Thank you thank you thank you.
    Been looking for something like this forever!! Simple and easy. Thank you!!

    Reply
    1. Lana Red says:
      6th March 2015 at 9:49 am

      You’re welcome :)

      Reply

Leave a Reply Cancel reply

Your email address will not be published. Required fields are marked *

ABOUTLRS
THE LRS NEWSLETTER
  • But you don't look autistic at alll
    PERSONAL | Grief and other things
  • JEWELRY DIY | Gold Leaf Teardrop Earrings
    JEWELRY DIY | Gold Leaf Teardrop Earrings
  • UPCYCLING DIY Old T-Shirt Hair Scrunchie
    UPCYCLING DIY | Old T-Shirt Hair Scrunchie
One of my fav projects! The Origami Swan Brooch, made out of copperplate. It’s such a simple, yet unique item. Check out the blogs archive for the full tutorial!
BOOKSWAP! (For now, this is for all Dutch based friends)
The Dutch COVID lockdown has been extended for another 3 weeks. I am lucky to still have steady work as a freelancer and I know that it is hard on so many people, but let's all stay safe and take this serious.
NEW ILLUSTRATION • This time it's a personal one: A drawing of my sister Kelly, who passed away last year.
NEW ILLUSTRATION! • This time it is Christmas themed. Hurray!
It's official: we, the cheese loving Dutchies are in Covid lockdown.

Sign Up for the LRS Newsletter

Let's be friends!

  • Privacy Policy

Input your search keywords and press Enter.