LRS
  • START HERE
  • DIY
    • SEWING & STYLE
    • HOME DECOR
    • JEWELRY
    • TECH DIY
    • ANIMAL
    • ROUNDUPS
    • CHRISTMAS CRAFTS
  • FASHION
    • NAIL DESIGN
    • HAIR
    • MAKE-UP
    • OUTFITS
    • FASHION INSPIRATION
    • TIPS & ADVICE
  • RECIPES
    • BREAKFAST
    • DESSERTS
    • TREATS
    • SAVORY
  • TRAVEL
    • TRAVEL
    • BERLIN GUIDE
  • INSPIRED
    • ART
    • BLOGGING
    • PERSONAL
  • ABOUT
    • CONTACT
  • SHOP
  • START HERE
  • ABOUT
  • CONTACT
  • SHOP
L A N A R E D S T U D I O
  • CRAFTS

    SEWING & STYLE

    HOME DECOR

    JEWELRY

    ROUNDUPS

    TECH DIY

    CHRISTMAS CRAFTS

    ANIMAL

    UPCYCLING

    HOME DECOR

    SMALL STUDIO APARTMENT | 10 Tips, Tricks and Ideas to Maximize Your Space

    TECH DIY

    DIY | Card Holder Phone Case

    JEWELRY

    JEWELRY DIY | Gold Leaf Teardrop Earrings

  • FASHION

    OUTFITS

    HAIR

    MAKE UP

    NAIL DESIGN

    FASHION INSPIRATION

    TIPS & ADVICE

    HAIR STYLES

    HAIR DIY VIDEO | Braided Scarf Hairstyle

    NAIL DESIGN

    NAIL DIY | It's a Glittery Sharpie Christmas

    Outfits

    OUTFIT | Autumn, Me & My Tripod

  • RECIPES

    DESSERTS

    SAVORY

    TREATS

    BREAKFAST

    BREAKFAST

    RECIPE | Sugar Free - Banana Bread

    TREATS

    RECIPE | Courgette Chips

    SAVORY

    RECIPE | Sweet Potato & Goat's Cheese Tart

  • INSPIRED

    ART

    BLOGGING

    PERSONAL

    BLOGGING

    BLOGGING | 6 Sources to get Inspiration for your next Blog Post

    PERSONAL

    VIDEO | STUDIO APARTMENT | Tiny House Tour

    ART

    INSPIRATIONAL TUESDAY | Floral Photography

  • TRAVEL

    Berlin

    TRAVEL | BERLIN GUIDE

    Travel

    LIVING ABROAD | How to Make Your Temporary Home Feel Like Home

    explore

    TRAVEL

    BERLIN GUIDE

  • Home Decor

DIY | Renters-Friendly Origami Ceiling Decoration

Total
150
Shares
0
0
150

DIY | Renters-Friendly Origami Ceiling Decoration

As you maybe already know, I am currently living in a sublet in Berlin. This means that I have very little furniture and stuff of my own. And most of all: no decorations. Because who packs decorations when you are living out of a suitcase, right?

Living like this made me realise how much a painting on a wall, or a pillow on a sofa can make a house feel more like home. So I have been looking into making a few decoration pieces, I don’t want to invest too much money into buying things to personalise my temporary home, but I also still want it to feel homy and a bit more ‘me’ instead of an empty sublet.

Combine the decoration cravings with my latest origami obsession and you have a renters-friendly-decoration-solution!

It was so simple to make and it doesn’t have to cost a thing, yes you read that right: you can make this project for free! All you need is paper, and a few pieces of rope/twine/ribbon.

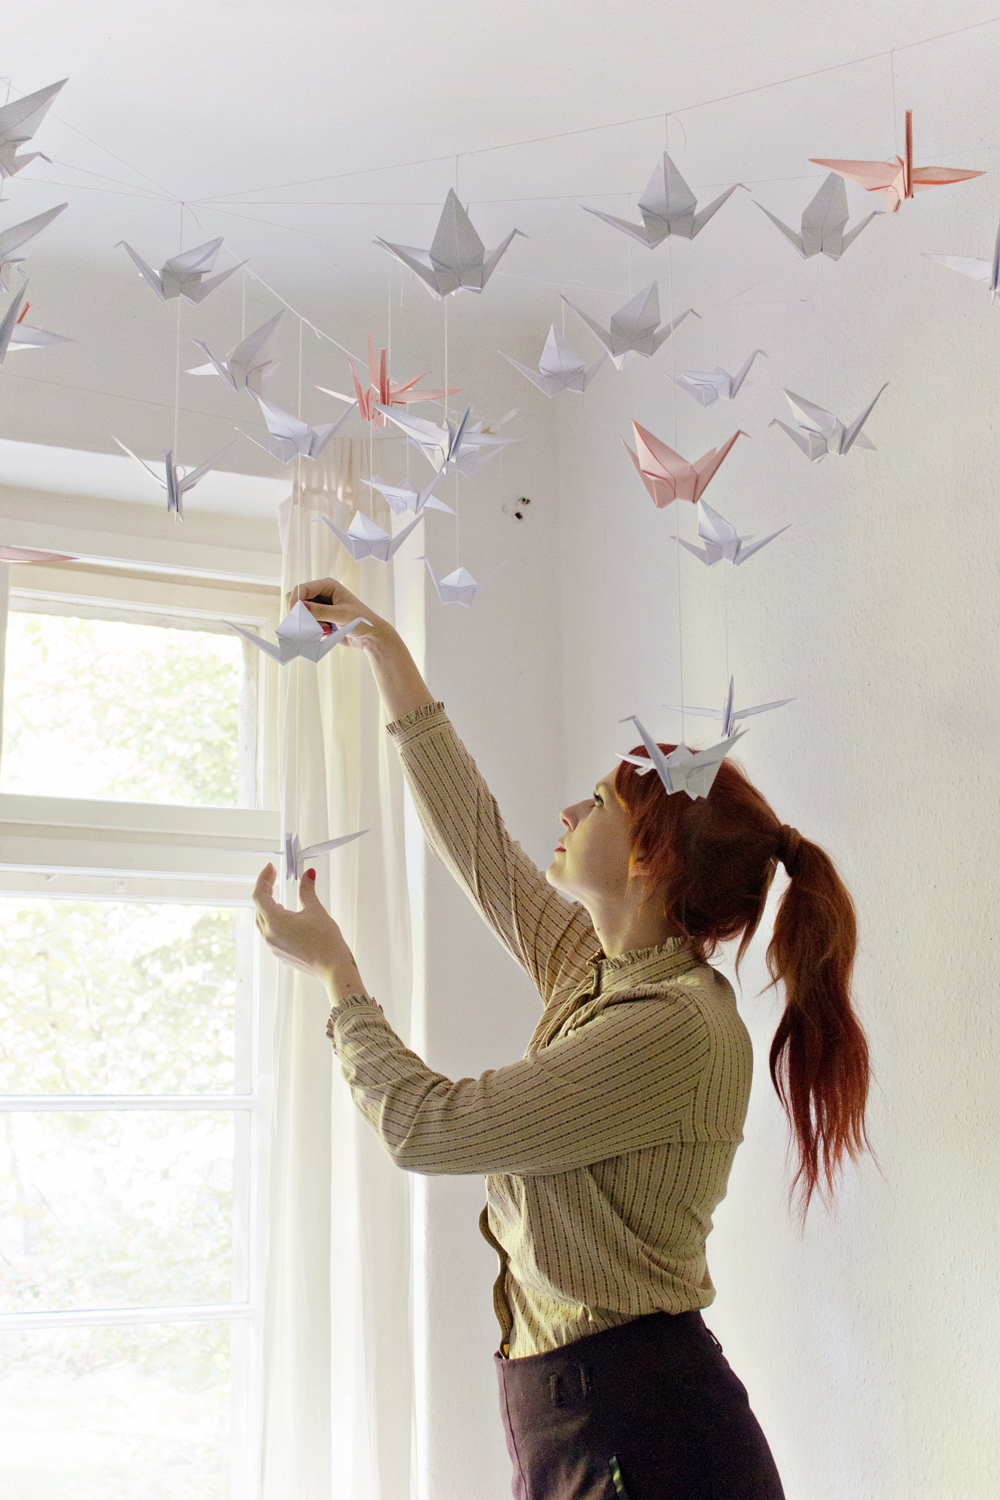
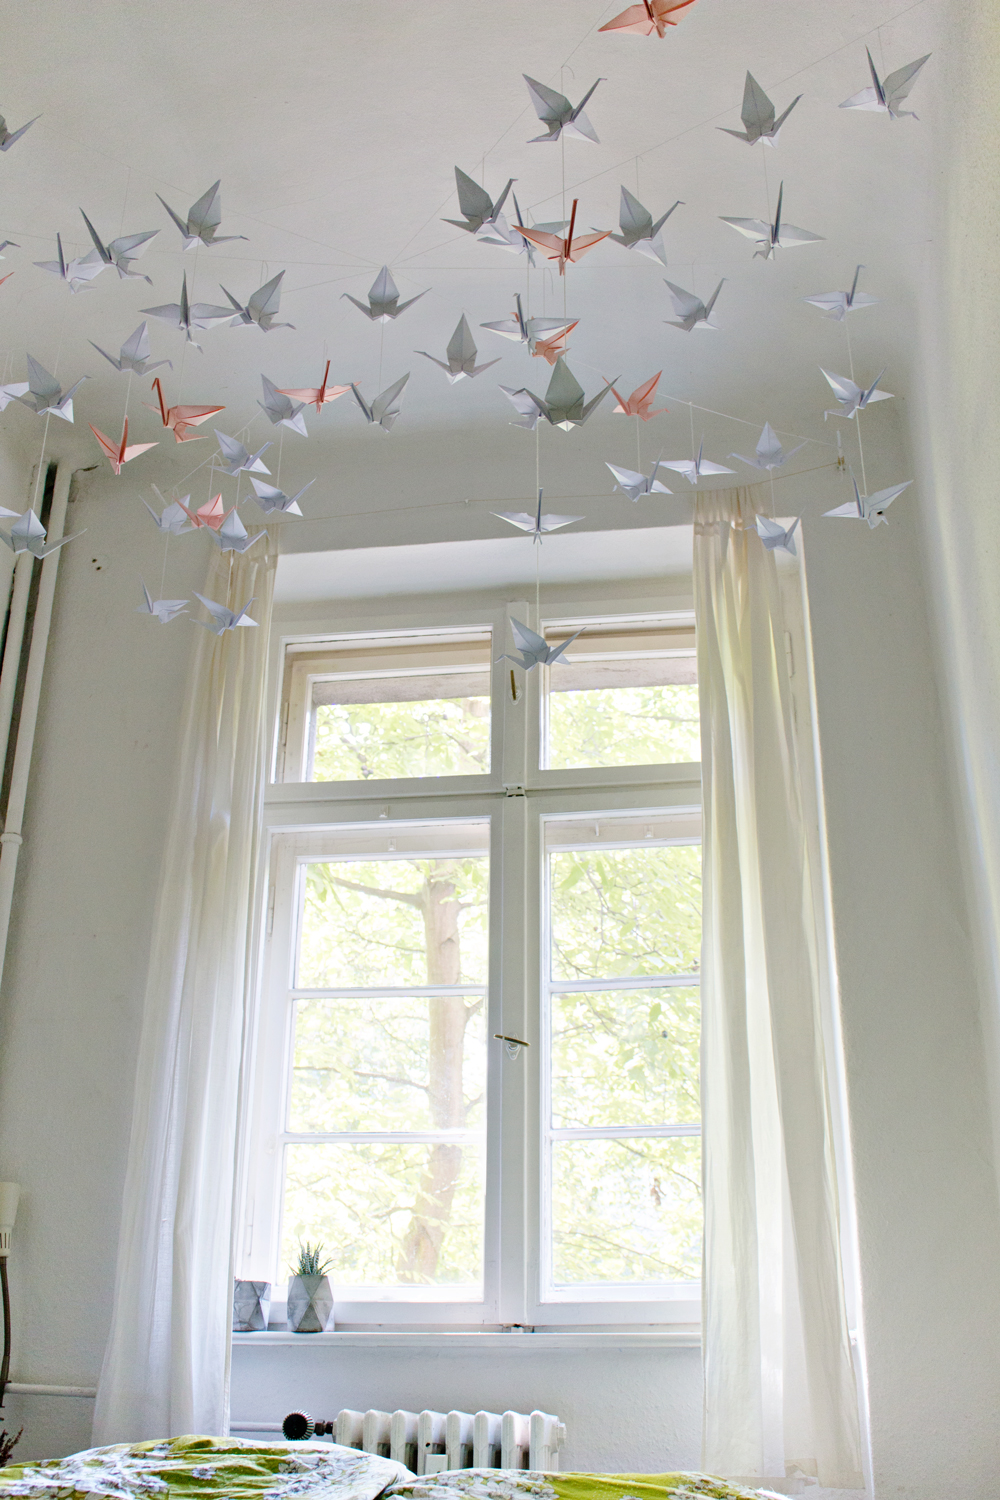
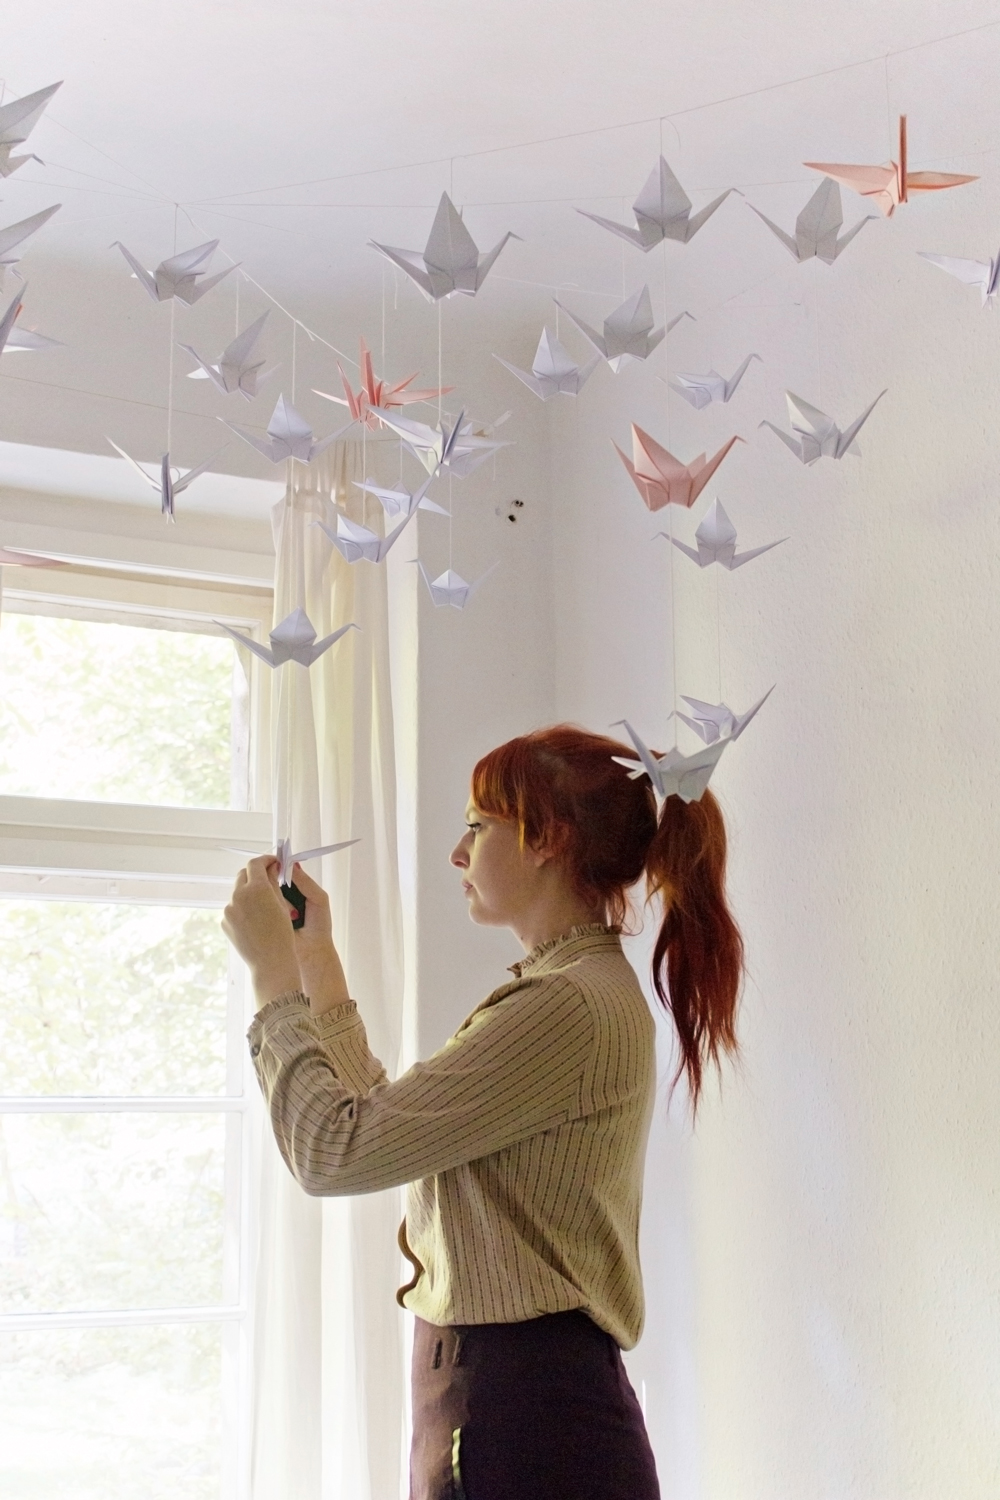
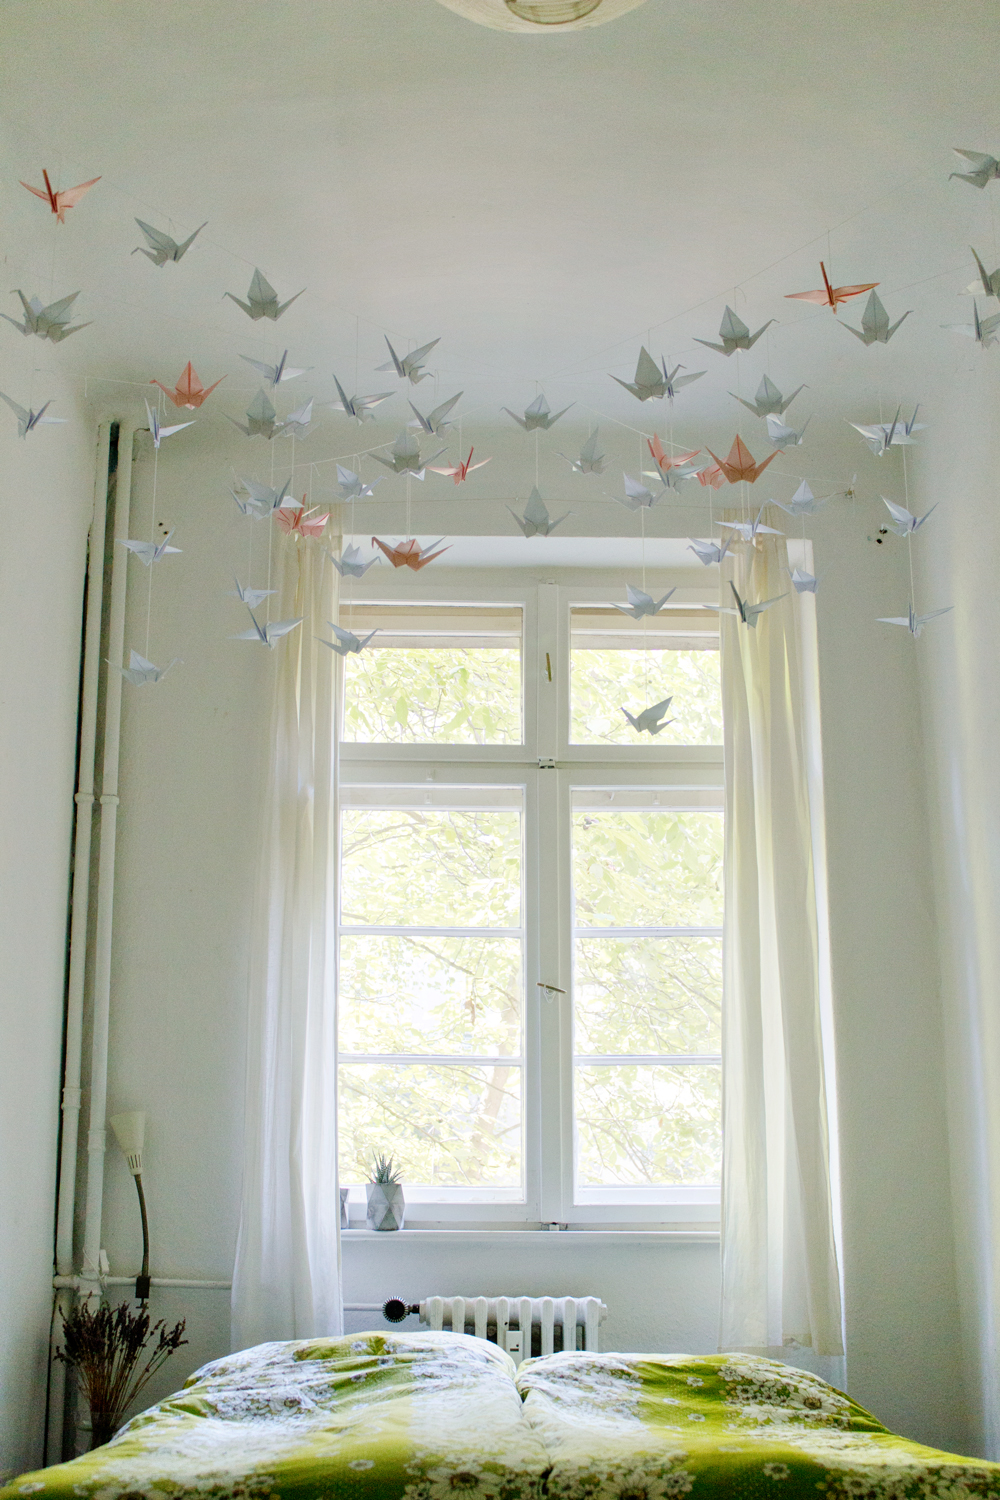
I have the origami crane installation above my bed, which is so magical. It makes me smile every time I wake up and look up. But you can hang this anywhere: above a sofa, a dining room table or even better: a kids room!


DIY

**Extra note before we begin: I use small nails in the wall to secure the origami structure. If your renters home doesn’t allow you to use those, you can opt for lightweight paper, like crepe paper to create the cranes. And use washi tape to hang the structure, to avoid damaging the walls.

STEP 1 

– Folding the origami cranes. There are so many great instructions online on how to fold an origami crane that it felt strange to add yet another step by step. So here are two of my favourite instructions that are extremely easy to follow:

Step by Step PHOTO instructions for folding a paper crane: click here
Step by Step VIDEO instructions for folding a paper crane: click here

– Fold as many as you like. You can mix and match with colours, paper (old newspapers for example) and even sizes.

DIY | Renters-Friendly Origami Ceiling Decoration

STEP 2

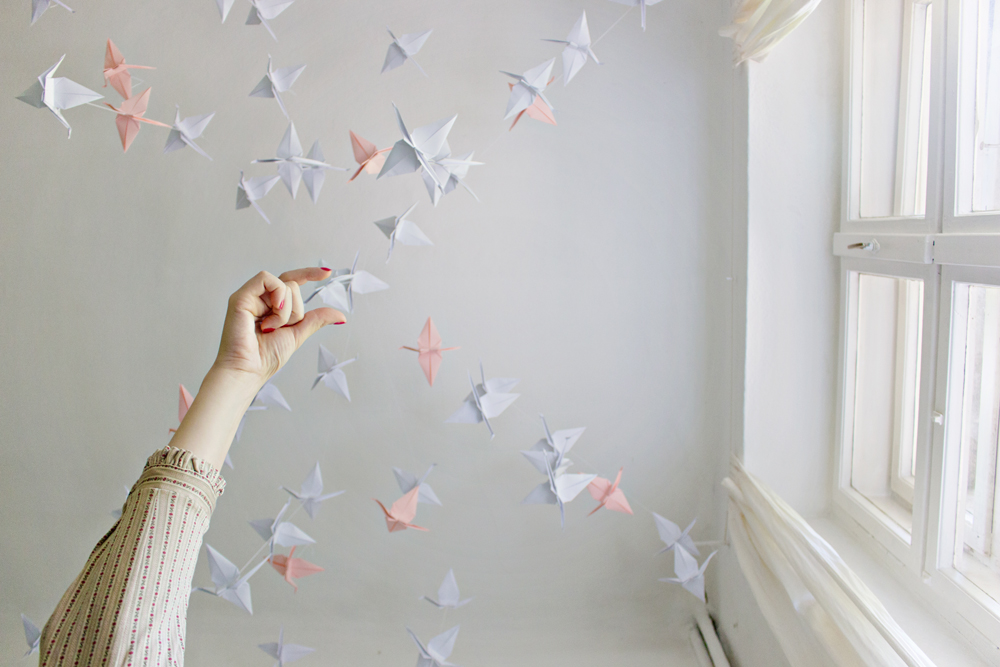
– For hanging a single origami crane, take a large needle and pull your thread through. Insert the needle in the top of the middle part (see photo above). Pull through and tie a knot to secure.

DIY | Renters-Friendly Origami Ceiling Decoration

STEP 3

– For hanging more than one origami crane on a strand, secure a long thread on the top of an origami crane as shown in step 2.
– Use the same thread and insert it with your needle into the bottom of the crane. Push it all the way through to the top en secure it at the top with a knot.

DIY | Renters-Friendly Origami Ceiling Decoration

STEP 4

– After you have prepped all of the cranes, prepare the hanging structure on the ceiling/wall. I used very small nails in the wall, 4 nails on each side spread evenly.
– Tie the thread around one nail and secure with a knot. Pull the thread over the the other side of the room (or another point on your wall/ceiling) and secure onto another nail with a knot.
– Repeat this for as many thread you need to hang your cranes.

DIY | Renters-Friendly Origami Ceiling Decoration

STEP 5

– Hang your cranes onto the basic structure. Mix and match with hight to create a playful effect.

DIY | Renters-Friendly Origami Ceiling Decoration DIY | Renters-Friendly Origami Ceiling DecorationDIY | Renters-Friendly Origami Ceiling Decoration

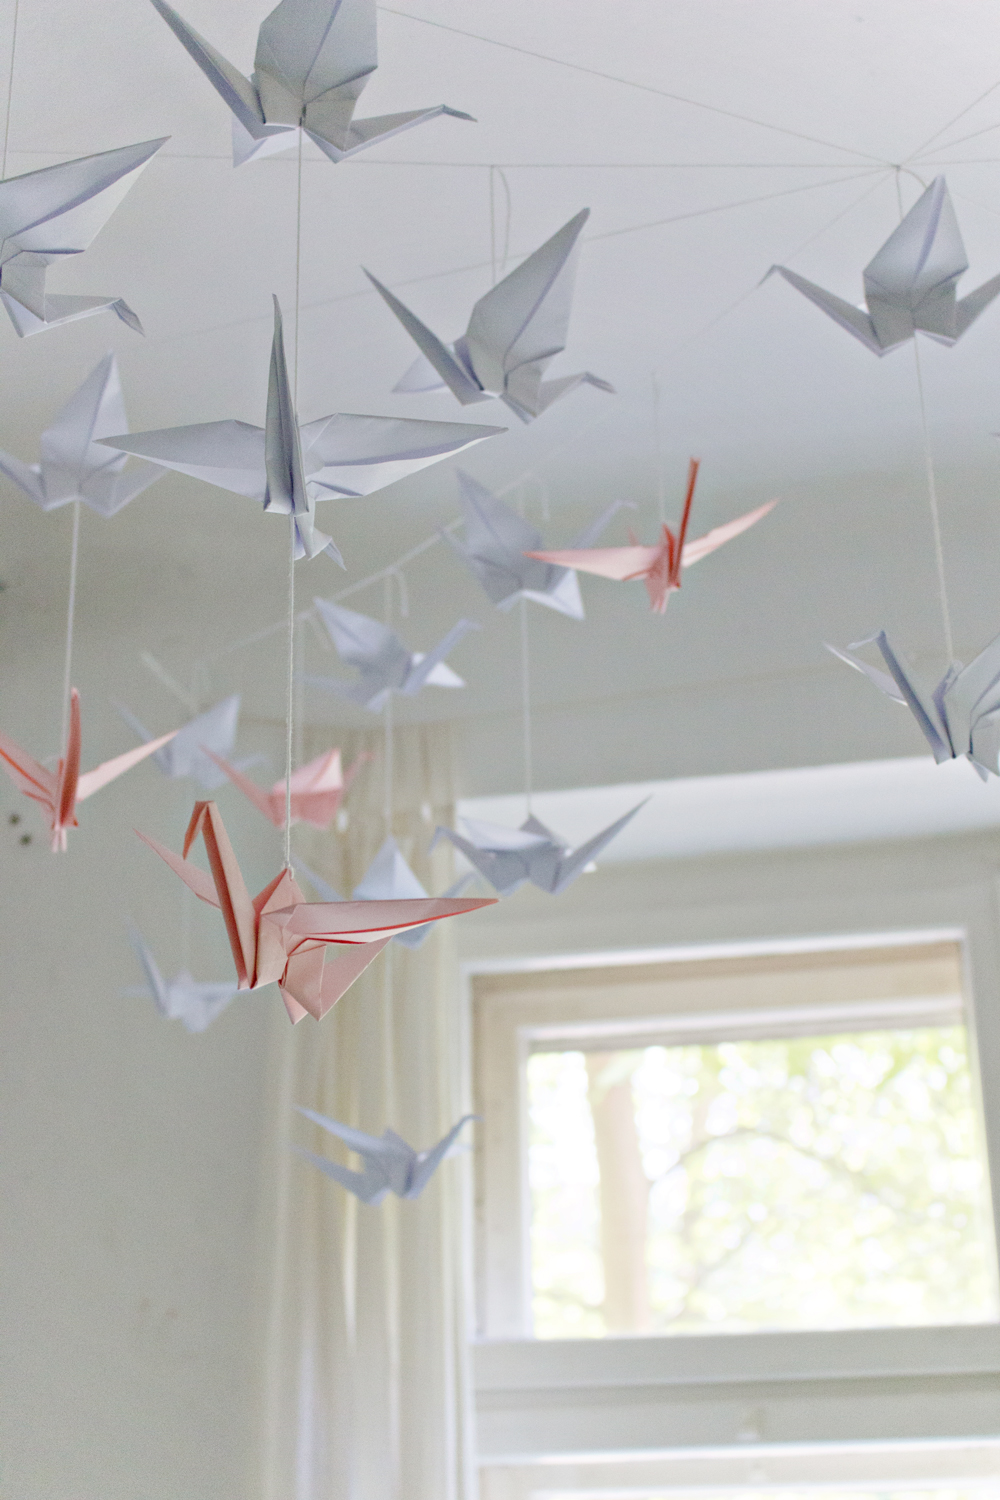
It is a magical view to wake up to: hanging the origami cranes above your bed. And when I open my window, the wind let’s them dance and fly on the ceiling. Also at night when my reading light is on, they create a beautiful shadow on the walls.

DIY | Renters-Friendly Origami Ceiling Decoration


Where would you hang your paper crane installation?

Total
150
Shares
Share 0
Tweet 0
Pin it 150
Previous Article
  • Outfits
  • Sponsored

OUTFIT | Birds Flying High

View Post
Next Article
  • Jewelry

DIY | Embroidered Copper Bracelet

View Post

Sign Up for the LRS Newsletter

Be the first to receive lots of crafty news!

Get ready for more creative articles:
SMALL STUDIO APARTMENT | 10 Tips, Tricks and Ideas to Maximize Your Space
View Post
  • Home Decor

SMALL STUDIO APARTMENT | 10 Tips, Tricks and Ideas to Maximize Your Space

HANGING PLANTER DIY | From Sifter to Planter
View Post
  • Home Decor
  • Upcycling

HANGING PLANTER DIY | From Sifter to Planter

RESTYLE DIY | Custom Sofa Fabric Design
View Post
  • Home Decor
  • Rijksstudio
  • Sponsored
  • Upcycling

RESTYLE DIY | Custom Sofa Fabric Design

DIY | Candle Wax Table Lamp
View Post
  • Home Decor
  • Upcycling

DIY | Candle Wax Table Lamp

ART DIY | Handmade Collage Greeting Card
View Post
  • DIYit/BUYit
  • Home Decor
  • Tech DIY

ART DIY | Handmade Collage Greeting Card

DIY | How to Restyle a Plain Cupboard
View Post
  • Home Decor
  • Upcycling

DIY | How to Restyle a Plain Dresser

PRINTABLE DIY | Oh Deer Christmas Wrapping Paper
View Post
  • Christmas Crafts
  • Home Decor
  • Tech DIY

PRINTABLE DIY | Oh Deer Christmas Wrapping Paper

DIY | Color Block Print Cushion Cover
View Post
  • DIYit/BUYit
  • Home Decor
  • Sewing & Style

DIY | Color Block Print Cushion Cover

11 comments
  1. daria says:
    4th October 2016 at 11:46 am

    This looks really good! I love that you’re sharing renter-friendly ideas, I so need them!

    Reply
  2. Kam says:
    14th October 2016 at 7:46 pm

    Gorgeous! Also, you hair is looking beautiful. Are you still using henna?

    Reply
    1. Lana Red says:
      17th October 2016 at 1:24 pm

      Thank you so much! And, no I am actually not using henna anymore ( I plan on writing an update about it) I really loved the henna, but after a few months my hair became less red and more dark brown. So I guess I choose being a redhead over more healthy hair;) and went back to chemical dye..;(

      Reply
  3. emma says:
    10th December 2017 at 1:30 pm

    I love this. I had made 1000 cranes and was putting them into close vertical rows, basically making a closet ‘door’, but I didn’t really like it. Your method is so much more organic and fluid. I also prefer the more subtle colors as you did so I may start folding again and pass the multi colored ones on to someone with kids :P)

    Reply
    1. Lana Red says:
      13th December 2017 at 9:20 pm

      Hi Emma, Wow 1000 cranes! I can’t imagine how long that took, and maybe also how meditative that must have been:)
      The mobile in this project has a lot less cranes, so it will definitely be done faster. And I love that you like to start another paper crane project! Please let me know how it turns out! Lana x

      Reply
  4. MinecraftLover09 says:
    15th February 2018 at 8:52 am

    You are SOOÒOOO cool with DIY! Thankyou so much for the ideas and I will start making this right now!!!!Thx! Luv you! BTW, i had made 5,000 cranes!?

    Reply
    1. Lana Red says:
      16th February 2018 at 9:04 am

      Thank you!! And wow, 5.000 cranes! That must have been an amazing project!

      Reply
  5. Izzy says:
    15th May 2018 at 8:04 pm

    Wow I am currently decorating my room and needed some inspiration on some ceiling art ? thank you so much

    Reply
  6. Katelyn says:
    3rd June 2019 at 8:42 pm

    omg this room decor looks so beautiful that I want to put it in my room. I had a question. Which places did you put the nails on the walls? Because when I’m going to do this idea in my room I don’t really know where to put the nails lol.

    Reply
    1. Lana Red says:
      5th June 2019 at 9:24 pm

      Hi Katelyn, thank you for liking the room decor! The placement of the nails depends on how ‘high up’ you would like the mobile to be. I placed mine approx. 20cm underneath the wall to ceiling edge, but this was mainly because the ceilings were very high and I didn’t have a ladder:))
      The weight of the paper cranes will create the downward shape, so you will also have to calculate that in to the equation. My suggestion is that if you can reach the ceiling, to place the nails directly underneath the wall to ceiling edge. Happy crafting! Lana x

      Reply
  7. Marek says:
    7th December 2019 at 9:55 pm

    Nice!

    Reply

Leave a Reply Cancel reply

Your email address will not be published. Required fields are marked *

ABOUTLRS
THE LRS NEWSLETTER
  • JEWELRY DIY | Gold Leaf Teardrop Earrings
    JEWELRY DIY | Gold Leaf Teardrop Earrings
  • UPCYCLING DIY Old T-Shirt Hair Scrunchie
    UPCYCLING DIY | Old T-Shirt Hair Scrunchie
  • DIY | Card Holder Phone Case
    DIY | Card Holder Phone Case
New illustration: Yoga, plants, retro furniture and lots of prints and patterns. I know this screams hipster cliché 😄 But I secretly love to embrace the entire colourful vibe ✨ 54 3
Something about rabbit holes.. 🐇 41 1
Feeling creative this weekend? Check out this Postcard tutorial on the blog! •slide to the right for more process pics• 31 1
Some political satire for you this weekend. ✍️ 36 2
New illustration! ✍️ 51 1
I am sharing my first 4 photos of the GRL PWR(working title;)) series with you in my stories today. They are in their final editing stage and I am very proud, but also pretty nervous to just ‘put them out there’.😅 34 4

Sign Up for the LRS Newsletter

Let's be friends!

  • Privacy Policy

Input your search keywords and press Enter.